
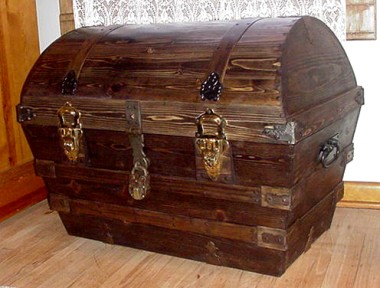
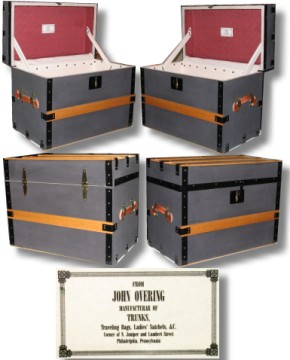
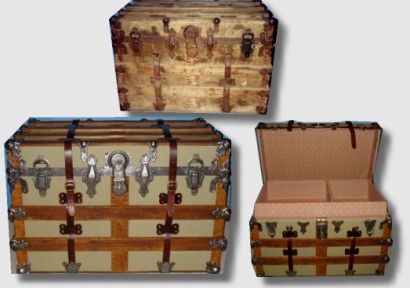
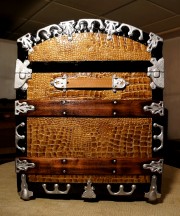
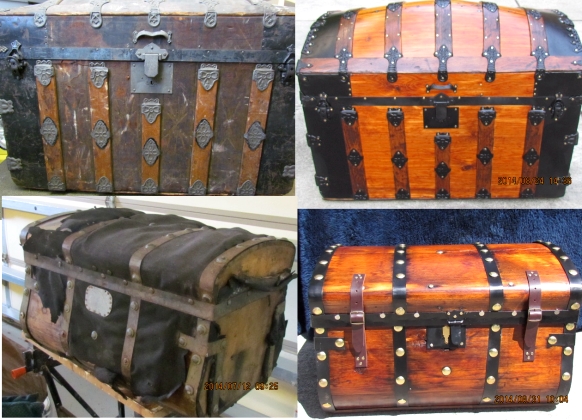
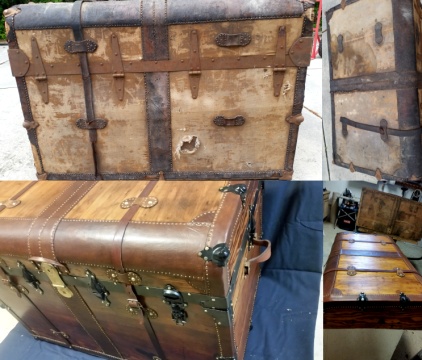
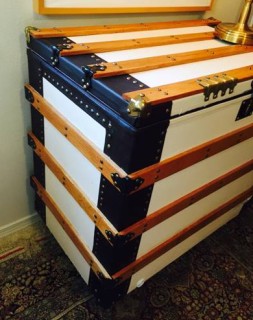
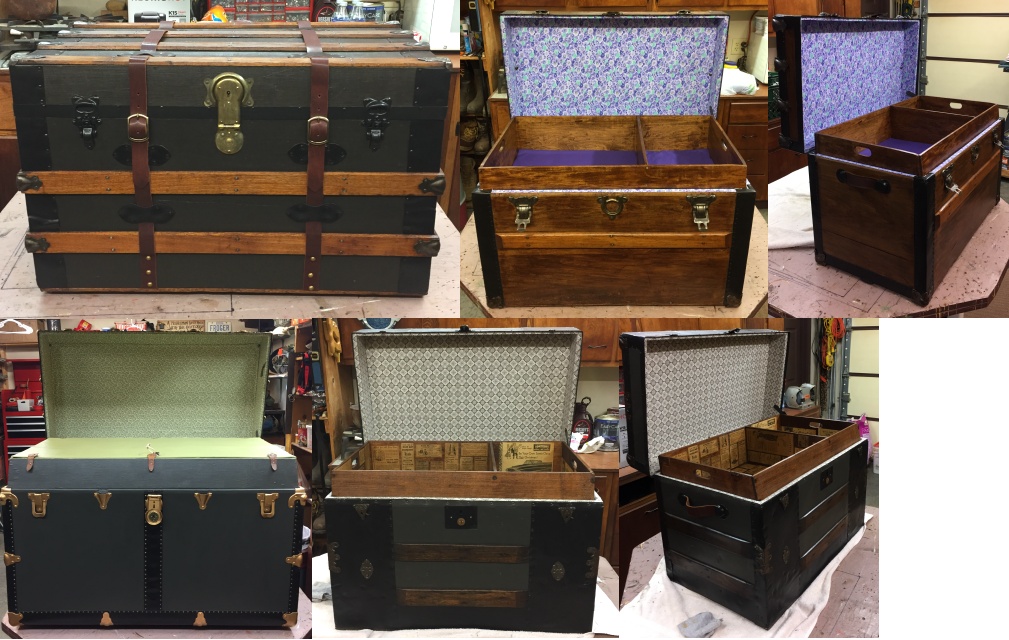
Showcase Filter
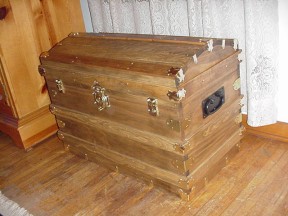
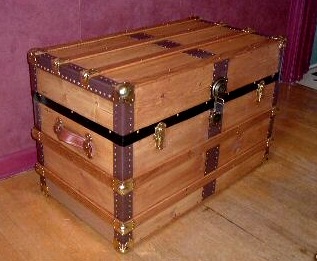
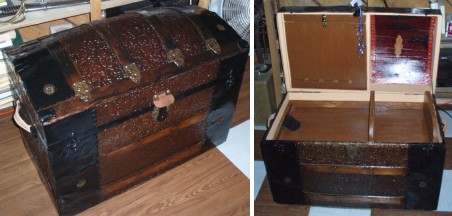
Federico used our cast iron chest handles to finish off this trunk that he made from scratch. FROM SCRATCH! Very nice work, Federico has created an heirloom that will last for generations. Here's another of his creations, added in May 2006
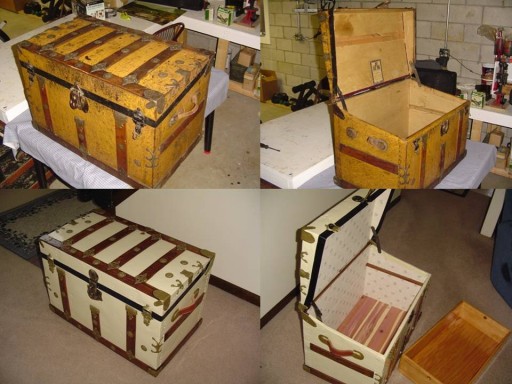
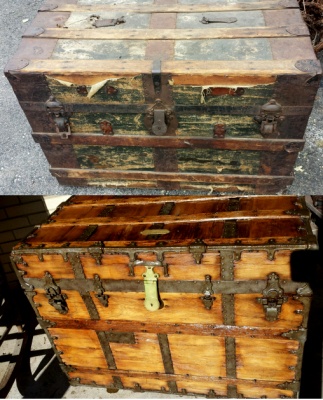
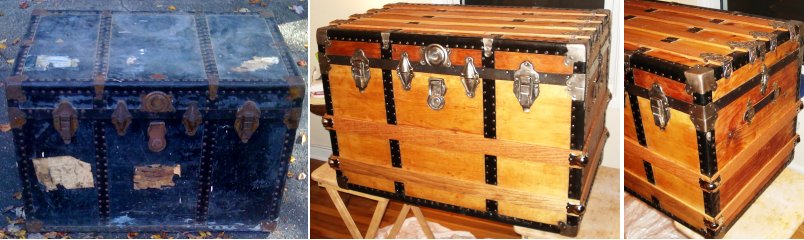
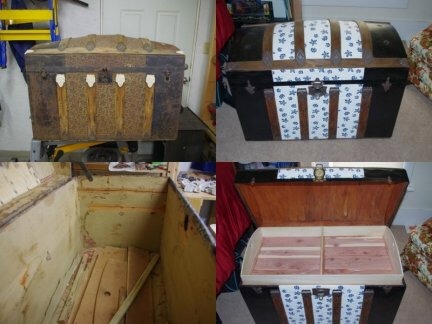
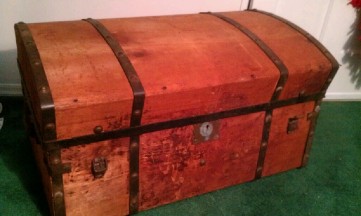
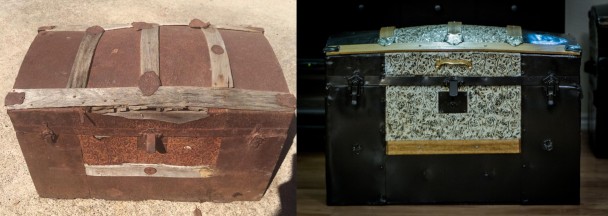
From Alan Mills in Carlisle, PA
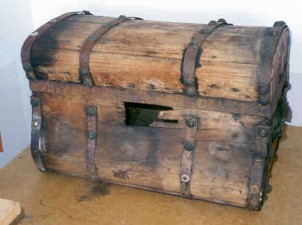
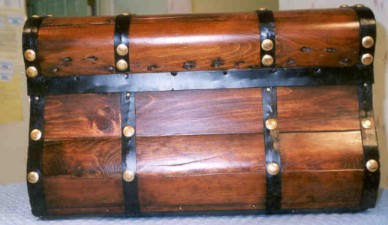
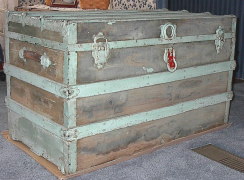
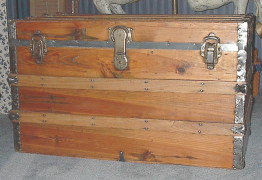
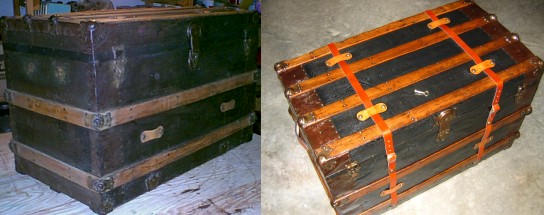
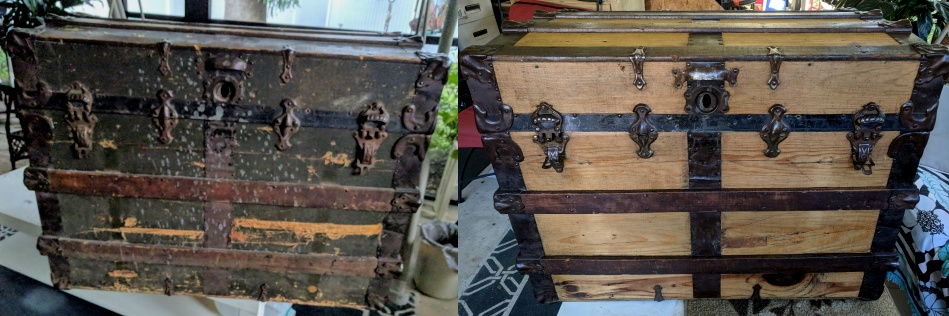
Alan must be the bravest guy in Pennsylvania. Can you imagine taking on this project? Even mice wouldn't live in that trunk the way it looked before. They all moved out. Nice work, Alan. The word 'miraculous' comes to mind.
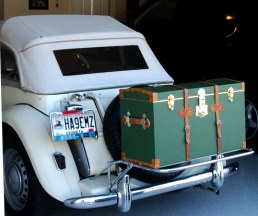
For the Back of the Buggy
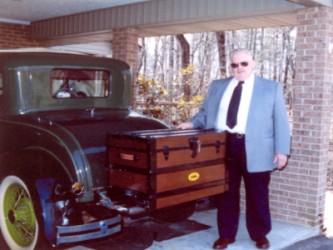
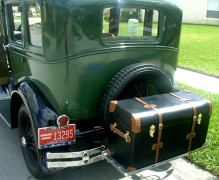
Robert Fisher of Virginia used some of our handles and tacks to complete this trunk for the back of his 1930 Ford Coupe. Although the trunk may not be the best looking part of the car, it still looks pretty snappy.
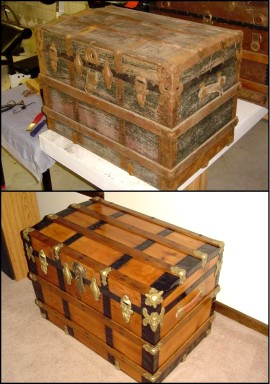
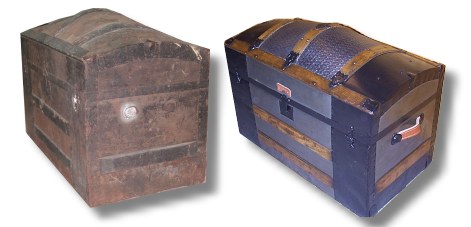
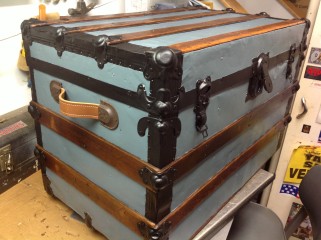
This guy has vision. Mike has bought a couple of trunks from our Compost Pile - but he manages to breathe new life into them, as you can see. We weren't about to mess with that weird paint, but it didn't bother Mike at all. Or maybe he's just not admitting to it.
Turned out to be a nice Christmas present for his wife. What a guy!
This is my first project but not my last. Thanks to Brettuns Village for the advice and parts I used! I also used the tung oil and golden oak with a little added secret ingredient.
Thanks again!
-John in SC.
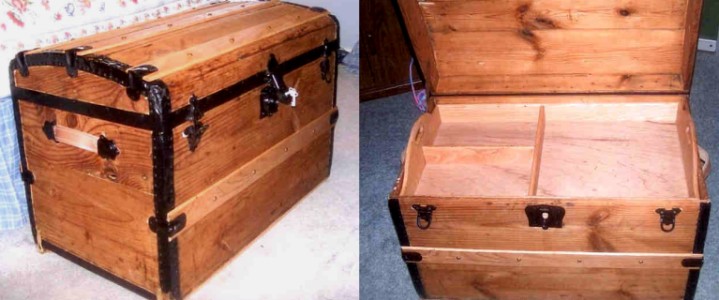
Check out this one that John built from scratch using parts from Brettuns Village:
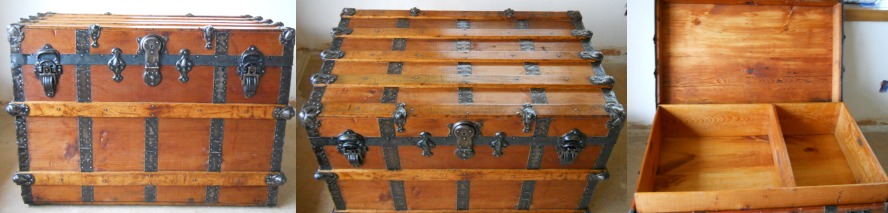
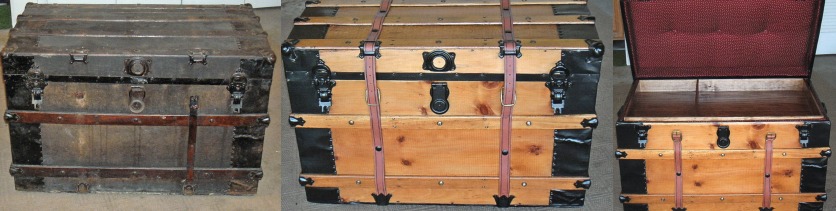
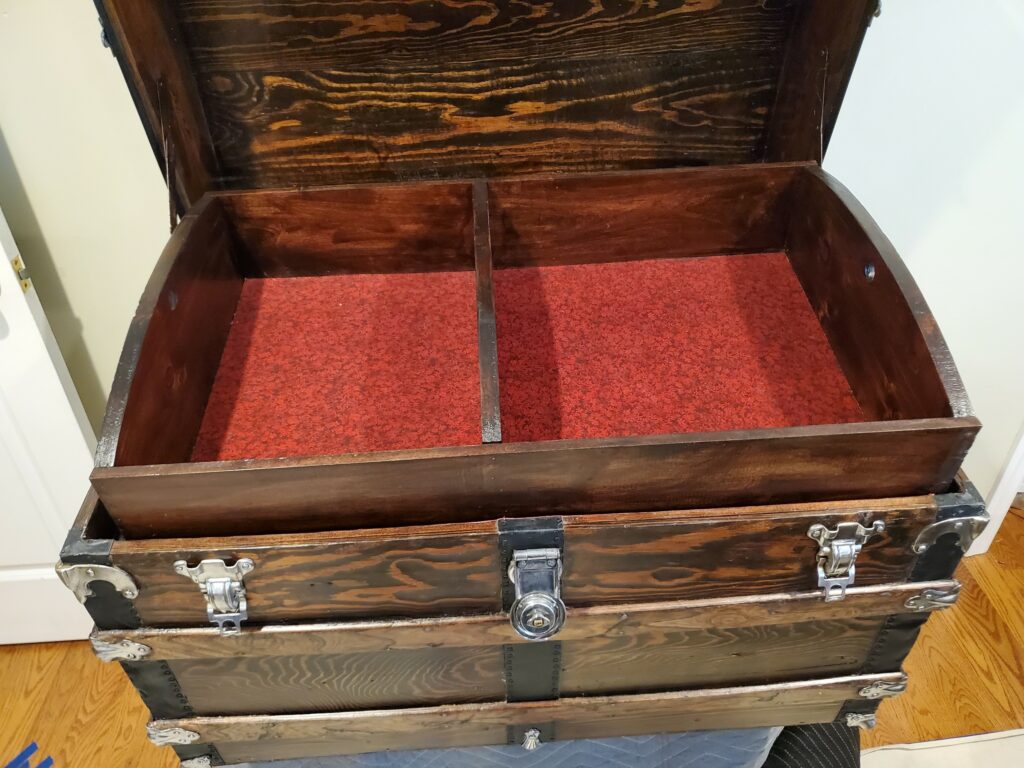
After refinishing several steamer trunks I decided to make one from scratch, after spending several days in my workshop I ended up with this replica of an 1880's steamer trunk. The trunk is made from one inch pine boards which I planed down to a half inch just like the original trunks, then added the oak wood slats and brass plated hardware. There are no screws in this trunk, the main trunk is nailed with small nails and all the oak slats and hardware were attached with solid brass tacks. The trunk has some small dings and hammer marks here and there, but that's from being hand made and not machine manufactured! It is made of 100% solid wood, no particle board or plywood in this one! Its stained with golden oak and a touch of cherry and mahogany stains.
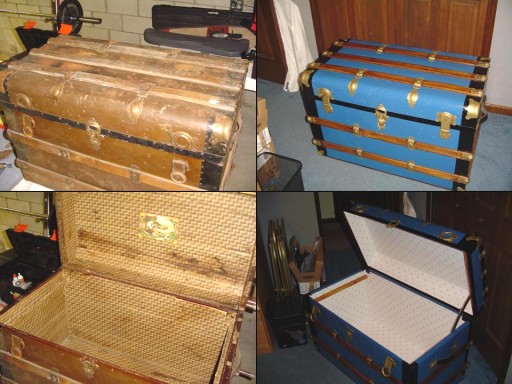
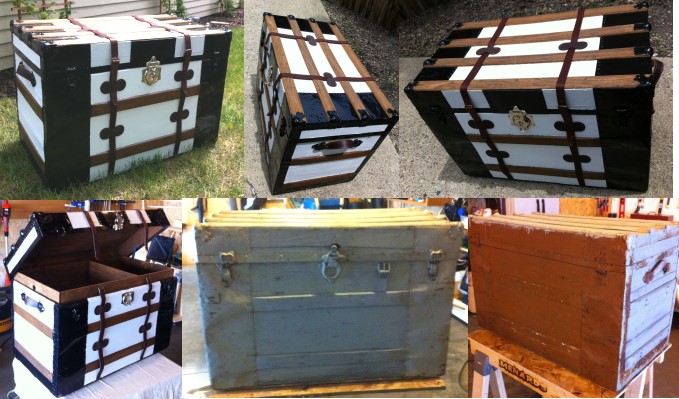
From Mike Vitetta - Custom Built for his 1930 Model A Ford
Mike used our handles, straps, and some spare pieces of matching leather to do the corners of his trunk.
They may not build cars like they used to, but Mike knows how to make the trunks. E-mail him your questions here.
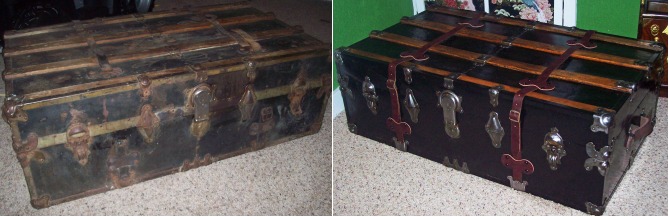
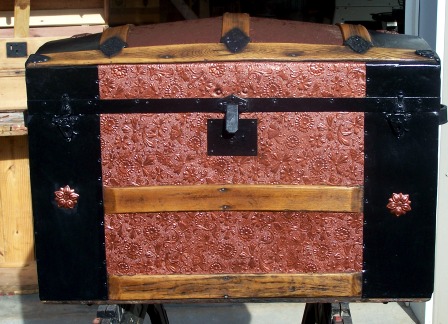
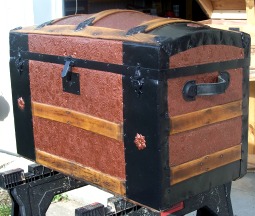
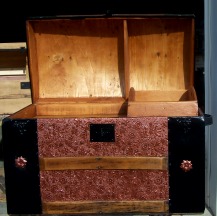
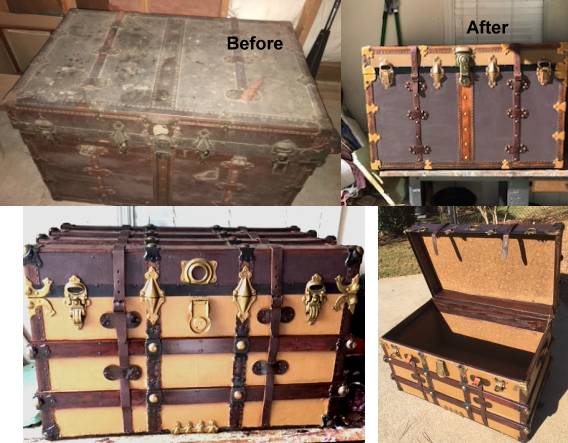
Thanks Again for your advice and help. The Handles, Straps and hardware were perfect. The information on your web site was really helpful to me. I decided to keep the original worn look, but removed the black paint that was in big runs all over the place. I scraped this thing with a dental pick carefully chipping of the paint and other crud from years of neglect. I sanded and used brass wire brushes to clean the embossed tin then used flat black paint. After it was dry I lightly sanded the tin to reveal the canvas like embossed pattern. A light scraping and sanding of the wood slats and some red mahogany stain (that maple don't take stain well) did the trick.
Followed all that up with two coats of thinned Tung oil. I think its safe to say that this will someday go to my kids.
-Les

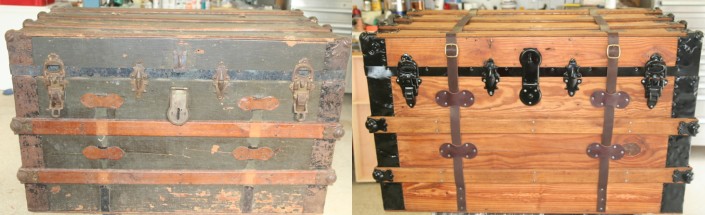
To all you good folks at Brettuns Village, Thanks to your help and wonderful website, I finally refinished my first trunk (first photo, above). It belonged to my great-grandfather and got passed down through the years. I took the "before' pictures a little late
(after I started tearing it down), but overall I was very pleased with the final outcome (even though I broke a cardinal rule and painted the metal!!). I hope this one is good enough to make your "Customer's Gallery". Thanks again for all the help,
Joe Mihm
North Branch, Michigan

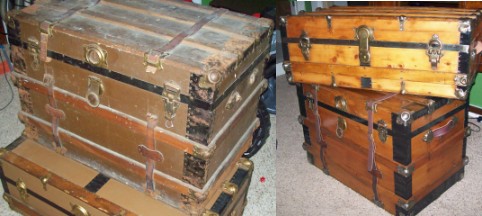
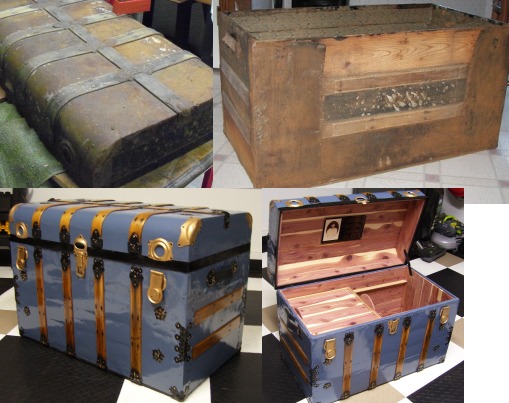
Well, you've got me good and hooked now, a hopeless basket case. I just finished my second trunk (my first is on your Customer's Gallery, and I have four more in the wings).
I bought this one off of George McConnell, whose name I discovered from your website- he is only about an hour away from me here in Michigan. I attached some before and after pictures.
All hardware was purchased through Brettun's village (advice was free!). You're website should come with a warning- "this hobby can be hopelessly addicting, and involves vast amounts of hard, dirty, detail work.
Enter into it at your own risk!" Once again, thanks for the advice.
Joe Mihm
North Branch, Michigan

From George Bernheimer:
This trunk is one I made, with your parts, for my wife to use in pre Civil War Territorial Kansas and Civil War era living history presentations that she and I do. Thanks again for looking out for us!
Best regards, George Bernheimer

Tom & Pat Gaber Worked a Minor Miracle
Hi: We ordered a hide from you in November 2004. We covered an old Majestic Mighty Monarch radio with the hide. You mentioned that you would be interested in seeing the finished product. Here are some pictures of what your hides covered up. It was a lot of work, but the finished radio is beautiful.
But here are the pictures - hope you enjoy them.
Tom & Pat Gaber
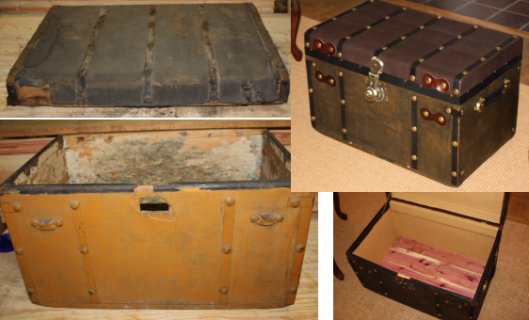
Here's one from Debra Early

Hi Churchill, I thought you might like to see the finished product. Your helpful suggestions provided me with guidance I would not have otherwise had and the
parts and supplies made it a fun project.
And we now have a usable trunk. You will note I was able to find suitable trim strips which were 1/4 " Aspen (inexpensive from Home Depot) which I tacked on with the short clinch nails so as not to protrude through the sides. By using 1/4" inch the original tray rails remained usable.
The original tray disappeared long ago so I made a replacement using 1/2" Aspen (glued and nailed) lined with aromatic cedar which came out very nice. The original interior was lined with a brown paper on the sides and paper cover cardboard like pieces on the bottom and top all glued in. This was in very poor condition.
Thanks again for your help,
Seaton Reed
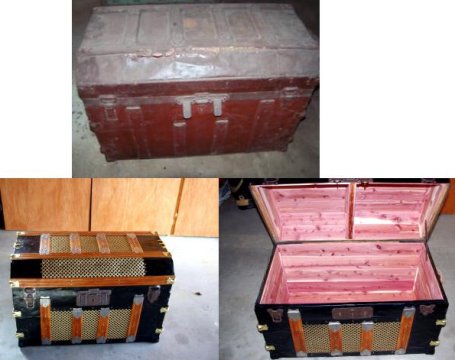
Take a Look at What Becky Prince Did
I always enjoy your newsletters and your website. Your website alone is like a reference book for refinishing a smelly old trunk and I appreciate all of your tips and advice.
I refinished the trunk using your shared knowledge from your website, as well as Brettuns Village's handles, leather straps and stays.
The tung oil and golden oak stain formula is great too and it took several applications to soak in the dry wood. I'm planning to begin working on another trunk this week.
Best regards, Becky Prince
Frank Hayes Performed a Miracle!
This was my fathers trunk, sat in the garage for 54 years that I can vouch for, not sure how many before. So, I tried to make it look cleaned up but not redone as you can see.
We are extremely pleased with how it turned out, couldn't have done it without your expert advice, beautiful leather pieces, nails and once again, your expert advice!
I would like to say for any other novices that want to take a project on like this- no matter how many nails you think you need, you will need more!
It does cause a break in the momentum waiting for them to arrive. However, it does give one time to reflect and reconsider 'hmmmm, maybe I should ???'.
That's what I did, and I love the result! Thanks again, hope to find a trunk in the neighborhood that wants to follow me home!
Frank Hayes, Grass Valley, CA
Howdy! Finally, after several hundred man hours of work and a couple hundred dollars in parts and supplies the trunk is completed!
Hopefully, the efforts of this family trunk restoration project are reflected in the attached photos along with photos of what I started with.
I do want to thank you again, for not just being a valuable source for parts, etc., but for answering my novice's questions and offering sound advice.
I stayed strictly to your philosophy of "keep it original" (no paint or screws, etc.) even to the point of replacing the canvas and of modifying the strap holders to conform to the originals. I think my wife and grandfather would be pleased. Best wishes for your continuing success.
James L. Jim Zartman
San Antonio, Texas
Covered in new leather. Don't the guys over at Brettuns Village Leather just love to see this type of restoration work!
Here's a winner from Jennifer Edwards:
Sir, May I introduce myself, I'm Thierry Vermeulen from Belgium (Europe) and I'm a professional photographer and graphic designer. Me and and my lady are active in the re-enactment scene (1833 - 1899),
and after buying a real 1890's field camera with tripod there was the need for a photographic toolbox. I never did this before, and the toolbox is made out of scratch, all by hand and I did not use any screws at all. Using no screws is something i learned from You, I'm very pleased to have found your site on the internet. Buying almost all the necessary stuff at Your shop, made it a lot easier to achieve my goal. Again thanks for the support, and hereby You will find 2 pictures of our new/old toolbox.
Friendly Greetings, Vermeulen Thierry
Antwerp, Belgium
Built From Scratch by Dave Lackey
Just wanted to say THANKS for the orders you filled and the questions you answered. Also, attached a photo of the completed trunk.
First attempt at anything like this and it was so much fun!
Best regards, Dave Lackey
Larry Larson's Miracle
I would like to thank Brettuns Village Trunk Shop for the advice you gave me on refinishing my trunk and also the parts you had shipped me to do the job.
I had bought my trunk at an antique place in Michigan for $22.50. I cleaned it up, little paint, removed the paint from the wood and tung oiled everything else.
I put on some new handles, hinge, and some embossed metal where I had a lot of damage and I now have a beautiful trunk.
Thank you, Larry Larson

Nice work by Donald Guss
Charles Wright took care of business on his Grandmother's trunk:
He even made a new tray out of oak!
Nice work, Chas!

The dark brown straps and tabs look great (we think!)
At long last the project is done. It took six weeks and more forearm strength than I thought I had. As you can see, all the metal was cleaned and shined. The disgusting vulcanite covering was shaved off and then the paper underneath was attacked with all manner of tools. The oak slats were custom cut by yours truly and then added to the sides and top. The edge clamps and the top clamps are from Brettuns Village, as well as the new handles, but the rest is original New Jersey steel. Not a bad way to spend 6 weeks. I wonder if I still have a job. Thanks for all the free advice on the website, without which this would not have been possible, your prompt answers to my inquiries, and your prompt shipment of my repeated orders.
Jed Painter
Thanks for having everything I needed to finish these and also for your great prices and advice.
Rodney Herring
I have enclosed before and after pictures of my first trunk project. Thanks for the excellent service and all the help. You have been wonderful to deal with. The grandmother of the bride was happy and I hope the bride will be also.
Larry Gattis
Look What Stan Gardner Did!
My first trunk project, someone had painted it all red at one time. I had to replace a board in the top and I also replaced all the slats and connectors, found a working key and lined the entire inside. I used brown shoe polish to stain the new slats.
It reeked of mold before I started. Now I have four more to do, to give to my granddaughters.
My latest project. It took lots of time to paint the embossed metal, but well worth it. It is the original color, as I discovered when removing the old handles. Built a new tray and lined it all with cedar. Hopefully the oldest grandaughter will have it for many years. Thanks for the the help and parts.

As promised, here is the trunk I just refinished. This is my first try. Thank you for all the trunk parts.
Here is my 2nd trunk. It was in a friend's basement went she bought her home over forty years ago. The old trunk had a metal exterior. Thank you for your trunk supplies.
All the best,
Robert Tyler, in California

Custom built trunks that you've got to see to believe. Chuck's Woodbarn is owned and operated by Charlie and Sherry Zeller.
Specializing in the lost art of steam bending wood to create beautiful hand crafted trunks and wood chests. A true family heirloom. A unique work of art, no two alike. Emphasis is put on fine craftsmanship and quality construction. We personally design and construct everything from the beginning jigs to finalizing with finishing the interiors.
Visit Chuck's Woodbarn by Clicking Here

While you've been sitting around thinking about maybe trying to work on that trunk that's out in the garage, Sally Weeks has been BUSY! Here are three of her trunks, in their original form on the left, refinished on the right. Nice work, Sally!
Here's her note:
It was hard work but, I enjoyed doing it. The end results were well worth it. The pink trunk belonged to my grandmother and had a date of 1880 on it . My mother had "antiqued" it 2 times. The first time, it was red! It had about 4 different coats of paint on it. Who knew it would turn out to be so pretty underneath all that ugly paint. The lock on it is beautiful. I did it for my mother who is 83 and I told her when I gave it to her that I wanted to be sure I got it back one day!
Thanks again for you wonderful web site. I learned everything from ya'll, I couldn't have done it without you and your great guidance.
Also, great parts department too!
Sally Weeks

I am sending along before and after photos of my trunk. Genealogy research shows it likely came from Minnesota to Oklahoma, then to Kansas between 1878 and 1890. My great-grandmother, grandmother, and mother all stored family photographs in it. I guess I may as well carry on the tradition now that it looks a little better. I spray painted the embossed tin base coat then repainted the flowers by hand with an artist's brush. I decided to let the bright brass develop it's own patina with time rather than paint it.
Val Jansen
Wichita, KS
Hi Brettuns Village!
I just wanted to say thank you for all the help you've given me over the past six months either through your website or in e-mails. I've really appreciated it and it definitely helped. Here are a few pictures of my finished trunk, Tung Oil finish and all!
Sarah Ludwig
Here's a Before/After Pic from Adam
$20 steamer trunk I found on Craigslist. Lots of scrubbing and finished in tung oil. All new leather from BrettunsVillage.Com
These are some pictures of the trunk I restored for my Grand Daughter. I bought all the parts to restore it from you.
The Grand Daughter was brought to tears with joy, she really loved it; was a moment for me to cherish for the rest of my life.
Carl Freeman
Jerry runs Boonsboro Trunks in Boonsboro, Maryland. Excellent work, in our opinion!
Contact Jerry by e-mail here.
I wanted to thank you very much for the very entertaining guidance you provided online concerning restoration of old trunks.
I thoroughly enjoyed it and felt it was 100% helpful. The parts I ordered were also top notch, especially the leather.
My wife is definitely thankful as the trunk belonged to her long dead Uncle. I thought you might like to see before and after photos of an amateur attempt.
David Stacy
Hi: Brettuns Village
I know when we place orders, I always tell you I will e mail a photo of a before and after of one of the trunks we refurbish.
Well, I am sending one for you now (hopefully, it will go through). We would like your opinion on the finished product.
Will be calling soon with order. Thanks again,
Randy and Joyce Coss
213 Pine St
Waynesburg PA 15370
Gentlemen: Here are a couple of pictures of my trunk. I did use a wire brush on a drill for a couple of hours. This trunk was in very bad shape and I did the best that I could to restore it. Thanks for your help and the parts.
Linda Hursh
John Cunningham Took a Painted Trunk and Brought it Back to Life!
Here's another from John Cunningham:
I purchased all my parts through you. I started with bare bones and created a pirate chest almost 400 copper nails.
This is my first attempt at a chest and I will be a faithful customer for years to come.
I obeyed the rules, No screws!
Benjamin Heiser
Fine work that has been performed by someone who obviously takes great care to do impressive work.
Angelo is thinking about selling some of his masterpieces, so you may want to drop him an e-mail if you're in the market for a trunk!
Angeloarcoleo@yahoo.com

Get a Load of What Ray Lang Did!
We often pass up these old metal covered trunks that have been painted. For some odd reason we just don't get much of a kick out of using paint stripper.
Laura Balliet braced herself and went for it. Nice work! An unsolicited quote is always nice at a time like this: Thank you for the awesome supplies and advice from Brettuns Village to get me through this project. It's my first attempt at giving new life to these trunks. I picked this trunk up for $10 and since it was in pretty rough shape, I figured I should try and tackle it as my first. That way, if I messed up, I knew I couldn't make it worse than the condition I purchased it. The tray I built new because, although included, the original didn't seem repairable. Because the canvas was pretty much intact, I chose to strip the old blue and brown paint and repaint it with a couple coats of white. The leather, lock, hinges, feet, and clinch nails all came courtesy of your site. All in all, I spent about 40-60 hours on it with time dedicated here and there since last October. I'm looking forward to getting better at this with each "new" trunk I can find around town. This one definitely had a lot of lessons learned.
Thanks! Laura
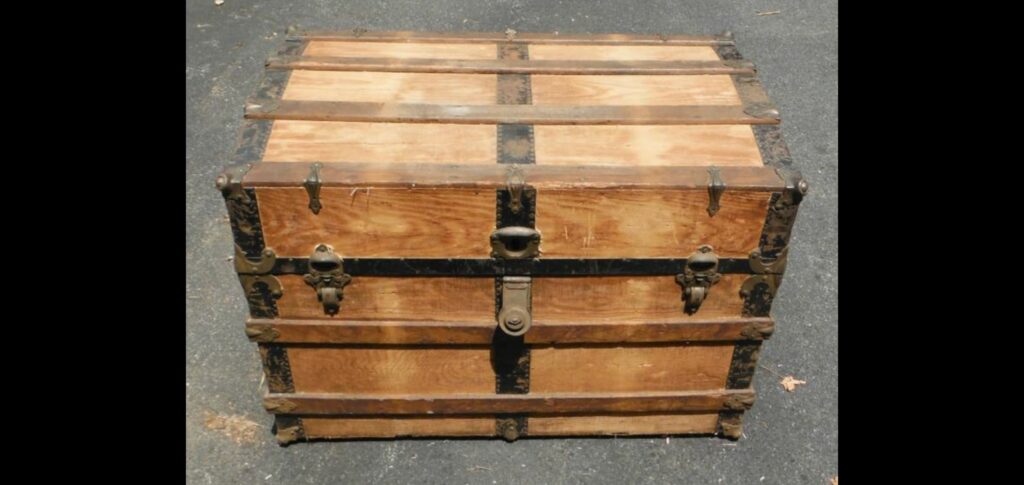
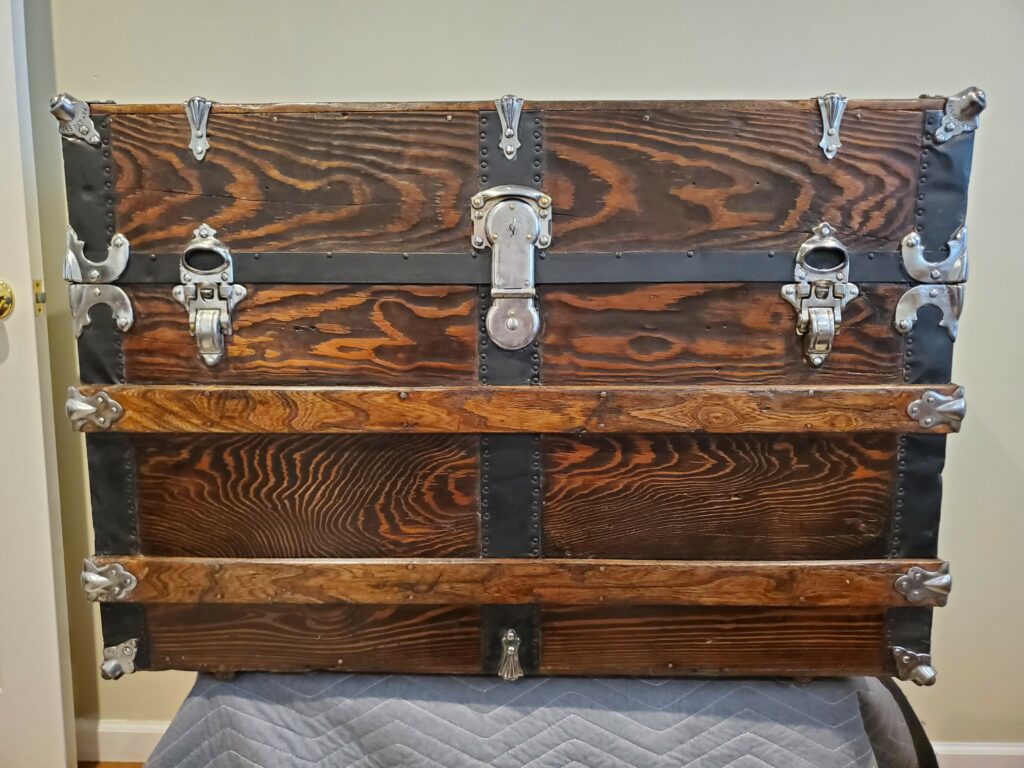
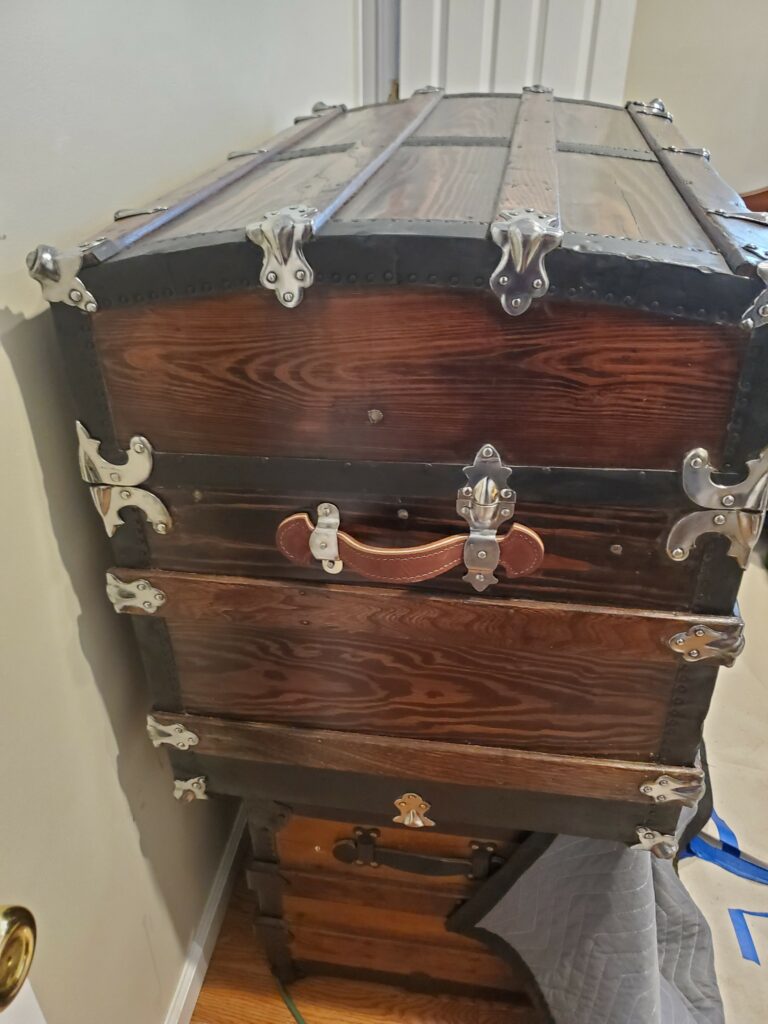
I finally finished my Steamer Trunk project and wanted to send you a few pictures. This was a great project to do, though also a really big project. It took 70+ hours to complete. Learned many interesting things along the way and tried several new skills. The trunk was built about 100 years ago. Based on the stickers the trunk traveled across the Atlantic ocean a couple times and had the opportunity to visit a couple posh hotels in Europe: Paris, Rhein Valley, and Black Forest. At some point the trunk was refurbished in Boston, the refurbisher�s emblem was on the inside lid. Sadly when it was refurbished it was painted a solid brown and the lock on the front was replaced. So to get it back to working condition I did the following:
Replaced missing or loose nails and rivets
Refinished the wood with stain and 5 -6 coats of Tung Oil.
There was dry rot and splitting going on
Patched up small holes in the canvas and painted it green
Polished the old brass hardware and antiqued the new brass lock (so they would look similar)
Reconditioned the leather and replaced the leather handles
Repainted the metal bands and steel sheeting on the bottom
The reproduction stickers have added the extra detail
Replaced the inner lining with wallpaper
We are now happily using the trunk as our coffee table. Thanks for all of your advice. Jim

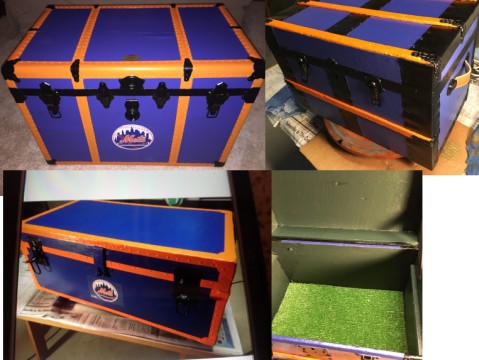
Just wanted to show you how I put to good use your handles and handle end caps! I chose a satin finish on this metal clad trunk. Thanks, Neil
More projects from Neil:
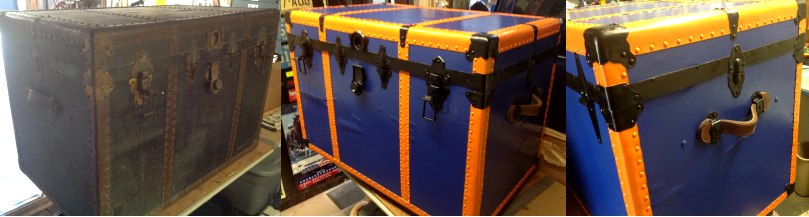
Neil says this last one was done in the NY Mets colors. Granderson may someday own this one!
Complete with Astro Turf!

First off I want to thank you from here to the moon for your very informative website as well as the extensive inventory of trunk parts and awesome prices. I have now completed two trunks and have enjoyed every minute of it. I could not have done it without your site. The first trunk was a big, ugly trunk my neighbor just gave to me because they couldn't stand the sight of it any longer. I will send pictures of that one later on. Lets just say they are sorry they gave it to me now because it turned out so nicely. The next trunk(s) I acquired is my great grandmother and grandfather's. We found both in a barn rotting away. They are the old zinc covered ones with the rounded top. It was heartbreaking to see them in the shape we found them in. I finished the first one because it was in the best shape, and the other which looks very similar in design is taking a bit more work then the other because the top was caved in and it was covered in rust. Normally I would likely have walked away, but these are priceless family heirlooms that were not properly cared for until now. I am including the first because I am still replacing slats and rebuilding the hump on the second and I can only hope in the end it will look as beautiful as this one. I can't tell you how excited I was when the parts we ordered from you came in the mail today! I'm including the after shots, as well as the before one from when we found them. I'm sure you'll be able to see which is which. :D I hope. Thanks again! I can't wait to get the other finished as well as get pics of the first so I can share!
This trunk work can be habit forming - here's Crystal's next project:
We finally finished the second trunk that we believe was my great grandfather's. We found the first I'd already sent you and this one together. Whether or not they were originally a set, we do not know but in a way they matched and in other ways they did not. This one has flat sheet metal instead of the line pattern mixed with the same pressed pattern. They were not the same colors either and their sizes seem slightly different. We had to rebuild the hump in this one and it was very bad shape when found. Basically solid rust. We had to patch many rust holes and deal with dents that we could. All the hardware on the slats was replaced using your parts as well as the lid stay and handles too. I'm glad to know I have somewhere to go with the next trunk I find in my possession! You always seem to have exactly what we need!
I just finished up another trunk with parts I ordered from you! This was the most difficult one yet because it needed all new wooden slats, flat metal, hardware and a completely rebuilt lid! Most people probably would have thrown it away, especially when they saw the free wasp nest, rat poop and termite damage that came with this awesome $10 investment, but not me! I broke the rules and used a few screws, but only when I had no choice to hold this rickety old trunk together again. It was very painful to resort to using them. In the end, this trunk will be a wonderful gift for my mom and someday a wonderful family heirloom to go with the other two that belonged to my great-grandparents. At least I know it will survive that long! I couldn't have done it with you and the parts you sell! Thank you so much for having affordable and accurate parts available for trunk hoarders like me! God Bless! I'll be ordering again soon! I just bought two more trunks! Hahahaha! Crystal Davis

First off I want to thank you from here to the moon for your very informative website as well as the extensive inventory of trunk parts and awesome prices. I have now completed two trunks and have enjoyed every minute of it. I could not have done it without your site. The first trunk was a big, ugly trunk my neighbor just gave to me because they couldn't stand the sight of it any longer. I will send pictures of that one later on. Lets just say they are sorry they gave it to me now because it turned out so nicely. The next trunk(s) I acquired is my great grandmother and grandfather's. We found both in a barn rotting away. They are the old zinc covered ones with the rounded top. It was heartbreaking to see them in the shape we found them in. I finished the first one because it was in the best shape, and the other which looks very similar in design is taking a bit more work then the other because the top was caved in and it was covered in rust. Normally I would likely have walked away, but these are priceless family heirlooms that were not properly cared for until now. I am including the first because I am still replacing slats and rebuilding the hump on the second and I can only hope in the end it will look as beautiful as this one. I can't tell you how excited I was when the parts we ordered from you came in the mail today! I'm including the after shots, as well as the before one from when we found them. I'm sure you'll be able to see which is which. :D I hope. Thanks again! I can't wait to get the other finished as well as get pics of the first so I can share!

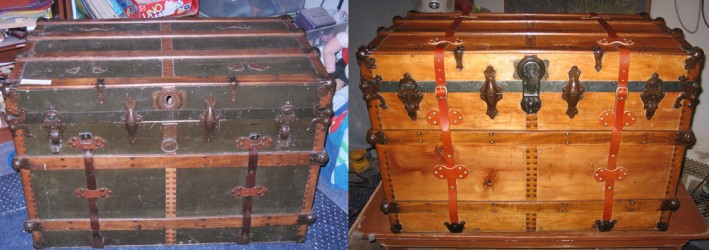
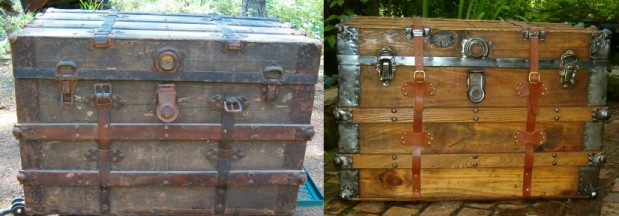
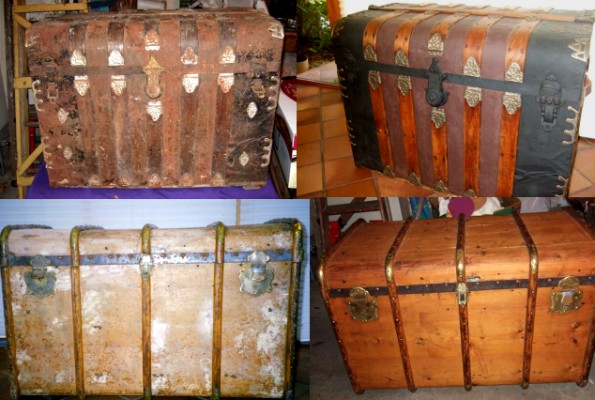
This is George McConnell's handiwork. George lives in Brighton, Michigan. George used our handles on his trunks. They're wicked smart in Michigan.

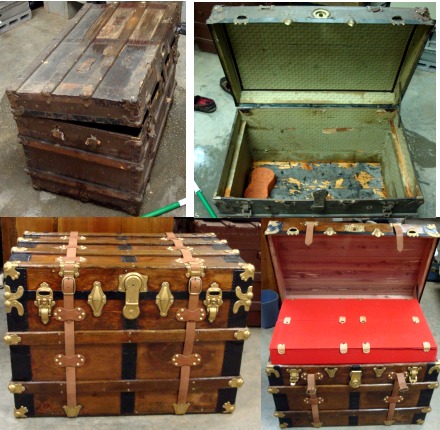
I am including some before and after pictures of my latest Trunk project. I was contacted by a nice lady about undertaking the job of restoring her mother's Antique Trunk.
Karen got my name from your website where I have some of my previous restored trunks in your Customer gallery section. The trunk belonged to her mother and has been in the family for generations. Karen wanted it restored in time to present it to her mom for her 89th birthday. I accepted the challenge after seeing some pictures it was a basket case in need of a ton of work. The lid had been detached from the body for many years with many areas completely rusted thru it also had a busted slat. The challenge was to have the trunk completed by Sept. 24th that is Karen's mother's birthday. Her mom will be celebrating #89 with her 4 siblings all of them are over 80! They will be gathering at her home to view the newly restored heirloom trunk. I have restored many trunks over the last 30 years this one was most satisfying.
Of course, all the parts needed for the job came from Brettuns Village thank you!
Best regards, George Mc Connell Brighton, Michigan
This is George McConnell's handiwork. George lives in Brighton, Michigan. George used our handles on his trunks. They're wicked smart in Michigan.
I am including some before and after pictures of my latest Trunk project. I was contacted by a nice lady about undertaking the job of restoring her mother's Antique Trunk.
Karen got my name from your website where I have some of my previous restored trunks in your Customer gallery section. The trunk belonged to her mother and has been in the family for generations. Karen wanted it restored in time to present it to her mom for her 89th birthday. I accepted the challenge after seeing some pictures it was a basket case in need of a ton of work. The lid had been detached from the body for many years with many areas completely rusted thru it also had a busted slat. The challenge was to have the trunk completed by Sept. 24th that is Karen's mother's birthday. Her mom will be celebrating #89 with her 4 siblings all of them are over 80! They will be gathering at her home to view the newly restored heirloom trunk. I have restored many trunks over the last 30 years this one was most satisfying.
Of course, all the parts needed for the job came from Brettuns Village thank you!
Best regards, George Mc Connell Brighton, Michigan

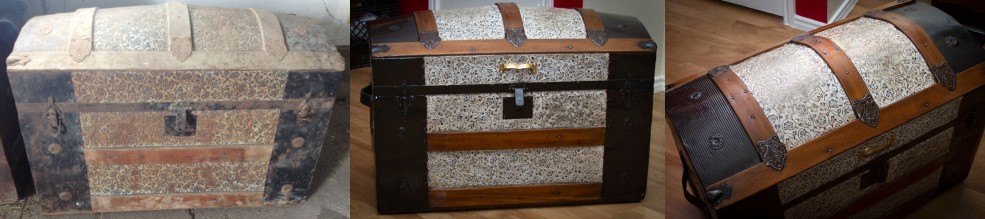
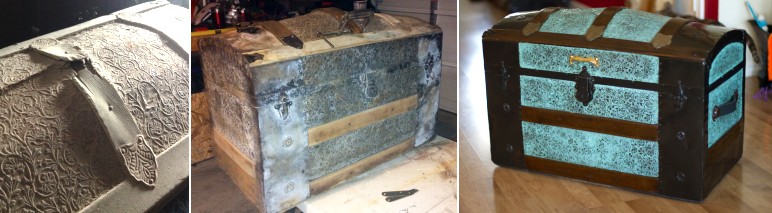
Before and After by Rosebacks!
See? It's easy - develop a vision for the trunk and then all you have to do is take it there.
Before and After by Rosebacks!
See? It's easy - develop a vision for the trunk and then all you have to do is take it there.
Before and After by John English!
John certainly had the vision - these look fabuous now!

Woodworking by Jeff!
One trunk leads to two, and then, of course, as one might expect, a ukelele case!
Woodworking by Jeff!
One trunk leads to two, and then, of course, as one might expect, a ukelele case!
Charleen Ross - Before and After!
Charleen Ross - Before and After!
We really enjoyed meeting you (to say nothing of the adorable Indie) when we called into Brettuns Village two weeks ago. We are now safely back in 'Old' England with very fond memories of our too short visit to the New. Particularly of Brettuns Village and Stonington, Maine. We are attaching a few photos of our first trunk which we gave a fancy interior when our son asked to borrow it for his wedding.
The quilting was on card with the idea of removing it to restore a more traditional lining once we got it back only it has never come back! If you think they are worthy of inclusion in your customer's gallery, please use them.
Hope you are enjoying the moose! Kindest regards; Andrew and Martine Kilby
Bruce Hill Has Vision!
He does fabulous restoration work! You can contact him: minicopr@yahoo.com
Bruce Hill Has Vision!
He does fabulous restoration work! You can contact him: minicopr@yahoo.com
OK, the apartment isn't huge, so the new chest freezer had to go in the living room.
Chris Bostwick disguised his freezer as a steamer trunk. Fabulous! All parts were GLUED on!
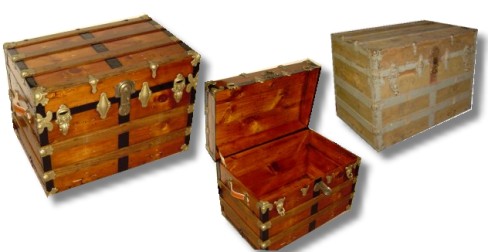
The antique trunks, vintage trunks, steamer trunks and chests shown here for sale are all one of a kind, hand-restored, refurbished and redesigned unique pieces of furniture that have been carefully selected and meticulously crafted.

The antique trunks, vintage trunks, steamer trunks and chests shown here for sale are all one of a kind, hand-restored, refurbished and redesigned unique pieces of furniture that have been carefully selected and meticulously crafted.
Thomas Earley has refinished a number of trunks - this is a fine example of his work.
He used only shoe polish and paste wax on this one!

Thomas Earley has refinished a number of trunks - this is a fine example of his work.
He used only shoe polish and paste wax on this one!

Thought I would pass along some photos of my finished project. The leather handles and loops look great and function well! This is a small chest I made from scratch with a bunch of cedar from a friend. It was destined for firewood. It is 18 x 18 and 12" high. Cut down pieces and glued up panels. Then, using my box joint jig, but the joints and fit the box together.
Cut off the lid. The finish was to first put a coat of shellac and the spray multiple coats of can spray lacquer. The chest is used to house the 300 piece wooden erector set for the grandkids when they come over to visit. Yes, all these pieces were cut, Drilled, and sanded. Each was finished with boiled Lindseed oil. I also made a small hammer out of walnut to use when pieces get a bit tight or stuck to take them apart or assemble. The yellow DeWalt container holds multiple boxes of bolts, nuts and washers to use with the pieces. Plenty here for a bridge or blanket fort for my one year old grandson. For the littler grandkids using the blocks without bolts works great. Good set for a huge game go Jenga.
Please feel free to post with my contact information pauljfricke@gmail.com Grand Rapids
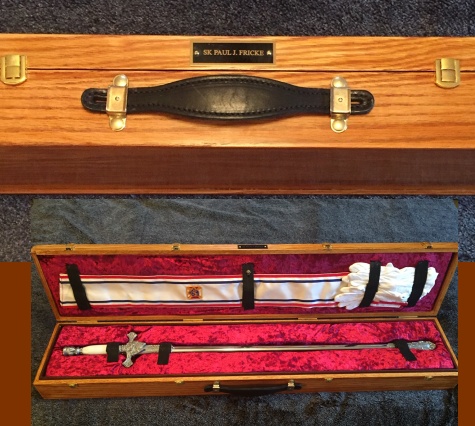
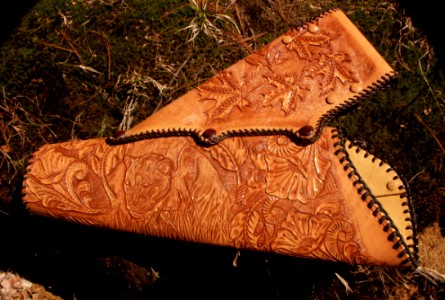
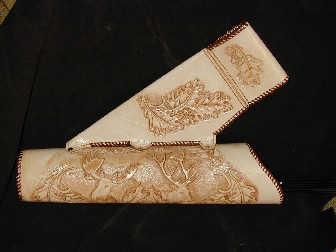
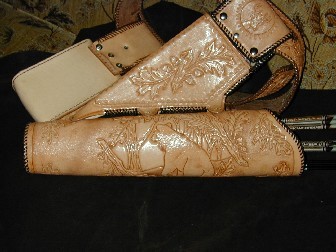
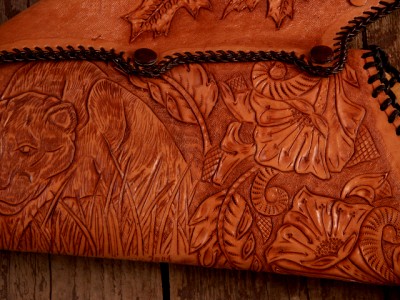
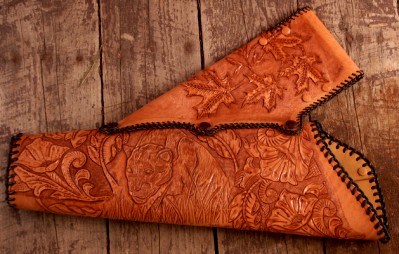
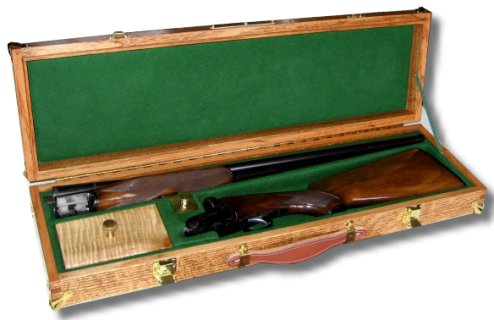
Attached are some photos of my latest project - a Knights of Columbus 4th degree Regalia sword carry case. The leather handle works and feels great. I also like the Chicago screws to hold the handle. The inside is a fine polyester cloth over foam. Tie downs are Velcro and are anchored underneath to loops epoxied to the panel. 39” x 7” x 4 1/2” with 1/4” oak construction. It’s finished with a French polished shellac and s few coats of paste wax. Inside lid edge is Australian Jarrah wood. This was build from an old oak dresser drawer left over from another project. My daughter commissioned me to build a dry bar out of an old oak dresser ( found on Craig’s list) for her boyfriend. I enjoy your fine products and quick shipping.
Paul Fricke
Faithful Navigator
Knights of Columbus
Msgr Thomas O Martin Assembly 2210
Wyoming, MI
Thought I would pass along some photos of my finished project. The leather handles and loops look great and function well! This is a small chest I made from scratch with a bunch of cedar from a friend. It was destined for firewood. It is 18 x 18 and 12" high. Cut down pieces and glued up panels. Then, using my box joint jig, but the joints and fit the box together.
Cut off the lid. The finish was to first put a coat of shellac and the spray multiple coats of can spray lacquer. The chest is used to house the 300 piece wooden erector set for the grandkids when they come over to visit. Yes, all these pieces were cut, Drilled, and sanded. Each was finished with boiled Lindseed oil. I also made a small hammer out of walnut to use when pieces get a bit tight or stuck to take them apart or assemble. The yellow DeWalt container holds multiple boxes of bolts, nuts and washers to use with the pieces. Plenty here for a bridge or blanket fort for my one year old grandson. For the littler grandkids using the blocks without bolts works great. Good set for a huge game go Jenga.
Please feel free to post with my contact information pauljfricke@gmail.com Grand Rapids
Attached are some photos of my latest project - a Knights of Columbus 4th degree Regalia sword carry case. The leather handle works and feels great. I also like the Chicago screws to hold the handle. The inside is a fine polyester cloth over foam. Tie downs are Velcro and are anchored underneath to loops epoxied to the panel. 39” x 7” x 4 1/2” with 1/4” oak construction. It’s finished with a French polished shellac and s few coats of paste wax. Inside lid edge is Australian Jarrah wood. This was build from an old oak dresser drawer left over from another project. My daughter commissioned me to build a dry bar out of an old oak dresser ( found on Craig’s list) for her boyfriend. I enjoy your fine products and quick shipping.
Paul Fricke
Faithful Navigator
Knights of Columbus
Msgr Thomas O Martin Assembly 2210
Wyoming, MI
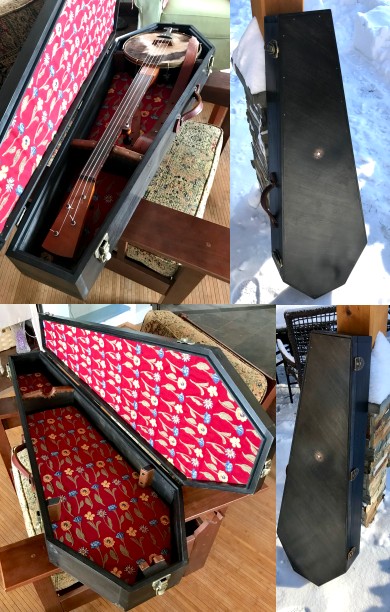
I made this 19th century style coffin case for my modern antebellum-style fretless banjo. I used truck hardware from Brettuns Village including the leather handle and handle brackets, the hinges, and the draw latches. Excellent quality, great function, and kept
with the 19th century look I was going for with this case. Thanks! Brandon Furber
"You know the work that goes into these trunks; mine has always been a pleasure, not like a job. I've been refinishing since 1981 and enjoy the look on the owner's faces when they see the work that I have done."
"My 1st attempt and I think I'm in love! Thank you so very much for all your help with my project! I'm sure you hear it all the time, but couldn't have done it without your guidance!"
"My 1st attempt and I think I'm in love! Thank you so very much for all your help with my project! I'm sure you hear it all the time, but couldn't have done it without your guidance!"
Hello! Wanted to thanks you for your help with my trunk project and send you pictures of my finished trunk! I actually ordered most of the replacement parts from you guys back in 2015, but then started traveling extensively for work and just go back to this project a month or so ago. All of the leather is from you, plus 3 of the 4 pieces of corner metal on the body, one piece of corner metal on the lid, bottom metal on one side, lock and hasps. When I found my trunk, it was OUTSIDE an antique shop due to being so dirty, rusty and dead-horse smelling. Love at first sight for me, LOL! I got it for $25.00.
My blog is officially up and running (DIYHappyGirl.com), you guys are mentioned frequently on the Trunk Restoration Page!
If you like it, please feel free to send people there for a step-by-step restoration experience. I don’t sell anything, just talk about DIY and personal happiness. Also, any feedback is always welcome and appreciated! Thanks!
I just wanted to say thank you! Your website was instrumental in helping me restore my first Steamer Trunk. Stripping the old Green canvas took so time, as did the metal polishing with a steel brush which was pretty brutal. The total project probably took me 80hrs,
but it was totally worth it! Also wanted to thank you for the recommendation on the Tung Oil. I really like the original Tung oil look and feel.
It makes it feel natural, rustic, and how it should be. This is only day 4 after multiple tung oil coats, so i am excited to see what it looks like after 30 days once it cures fully. Attached are a few pictures. Thanks again!
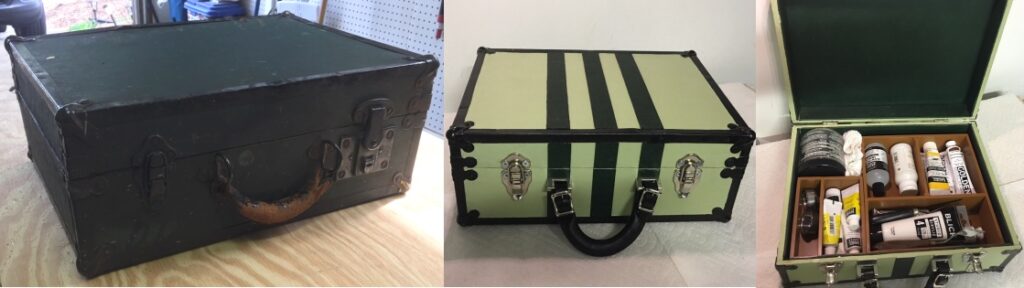
Hello! I inherited a box suitcase from my father. This goes back to the 1940’s. Dad was an artist as well as very handy so he converted it to carry his oil paints. When I went to university and majored in art I used it also. It started falling apart so I thought I would restore it, as I like to refinish furniture. I found your website and bought new hardware, hinges and handles. I used a green pleather as it would be easier to cleanup than real leather since I’ll be using to carry paints. I did my research and found a color scheme popular for the era. The major change was gluing some of the interior pleather to the outside in a pattern of three stripes, also popular for the era.
For the containers and dividers I cobbled silverware drawer organizers and made my own from bass wood. It was a really fun project and came out great.
David Prescott Rochester Hills Michigan
Hi Churchill. I Wanted to share this one with you that I did for my wife. Bought it not knowing what I had. I was able to get a working key. Lock is Yale & Towne lock co, Hartford CT. Handles from you.
I lined the interior and built a tray. Trunk is approximately 36" wide, 22" deep and 25" high. Thinking about straps which were original to the trunk. Corners stamped "Pat Apr 5 98".
Everything cleaned up to bright finish and appears to be silver (steel). Peter Madia
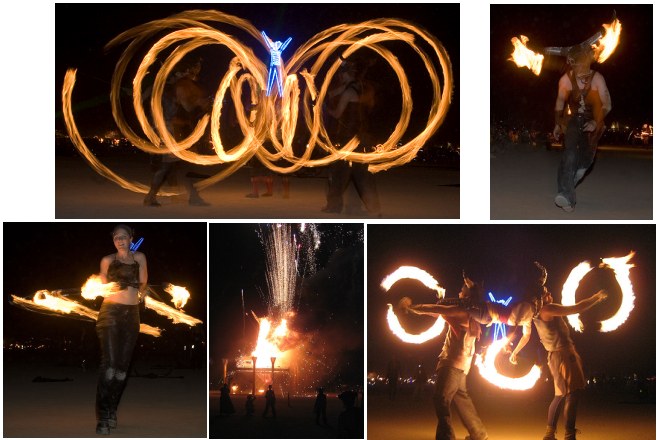
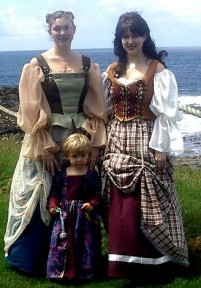
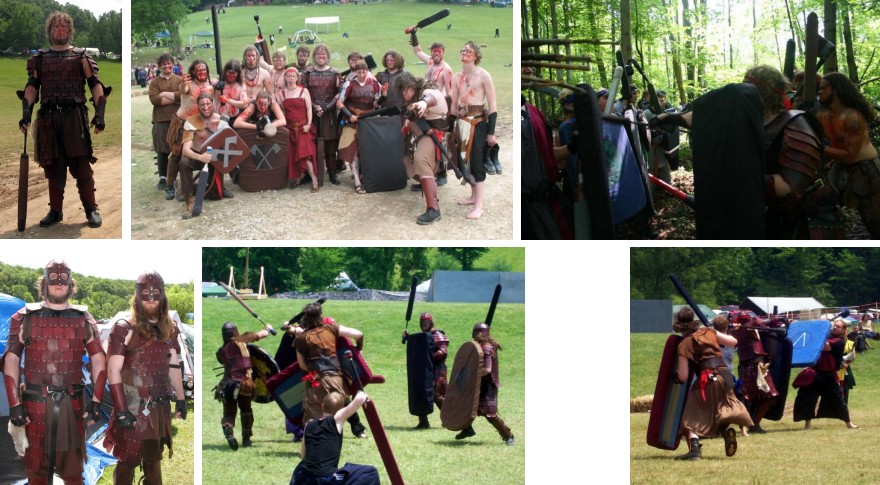
We did a fire-bullfight, with half of us dressed as matadors and half as bulls. I'm especially proud of the leather corduroy pants with kevlar stitching (better fire protection than my old nomex flight suit), which I'm wearing in the scary three person move, and the giant bullhead with flaming horns.
People kept asking me what it was made out of. I'd tell them "It's a cow face." They'd ask, "No, really, what is it made out of, it looks so real?" I'd say, "Really, it is a cow face. I got it from Maine.
" The cow faces also made appearances as a top for my girl Kara. So thanks for providing such interesting costume raw materials- ones that won't burn through even when splattered with huge amounts of flaming white gas (we didn't mean to check that one, but luck had other ideas). Now I just need a way of cleaning off that playa dust.
Best of luck this hunting season! Matt

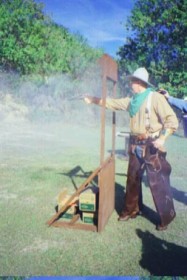
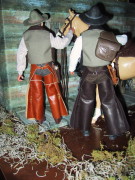
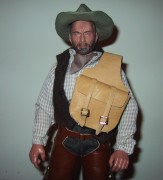
Just call Brettuns Village customer Jim O-Hanlon down in Florida and he'll bring his flame-throwing pistols over to your ranch. Whoa there, Jim - a bit heavy on the powder maybe.
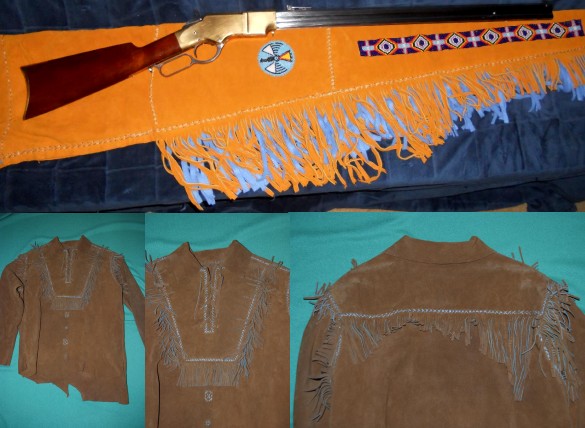
Here's a few pictures of my 'hobby' --- cowboy action shooting, with Leathuh accoutrements. This one shows my half-chaps-leggings (made with Brettun's Pigskin suede) I'm the guy on the right.... Yep, I shoot only black powder cartridges and have a reputation for 'flaming' the competition. I am the Florida State Cap n' Ball cowboy shooter in 2003.
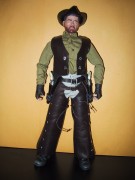
Here is one that shows me in (Brettun's Leathuh) chaps (batwings, with shamrocks in the corners) and Brettun Leathuh cuffs (these are roping cuffs cowboys wore to protect their shirt sleeves from getting caught in a rope when 'dallying' the lariat around the saddlehorn). Shamrocks on these, too.
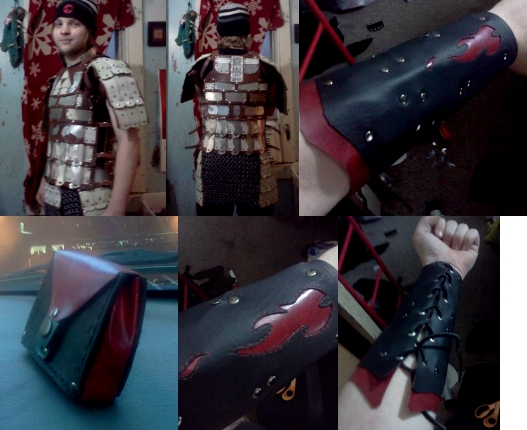
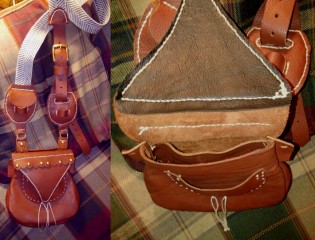
I am sending you some images of some leather armor I made from the buffalo leather scraps you sell. There is an upper body piece with hinged shoulder pieces, and some vambraces. There is also leg armor - but it looks just like the arm pieces so I am not sending a picture of them. The buffalo is very soft and is it very easy to wear these all day at the ren faires. I also make sword scabbards and belts and belt pouches.
Also there are pictures of a shoulder bag from some split leather with matching vanbraces and quiver.
This is what has become of some of your suede splits. I tried to make a replica of the leather shirt John Wayne wears in Hondo. Also made a rifle sleeve with bead work. It is lined with an ultra-soft blue fleece blanket. Except for the bottom of the bib on the shirt, all fringe edges are natural edges.
Thanks for being a great supplier-
Ason Louviere ( aka Rick Cottontree if you visit Scarborough Faire in Waxahachie TX or Tex Ren Fest in Magnolia TX )
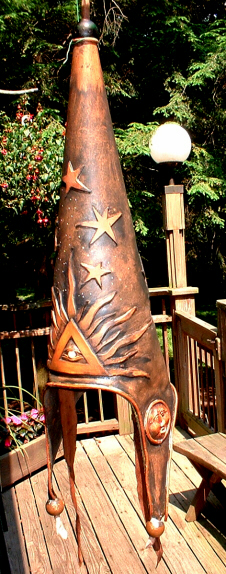
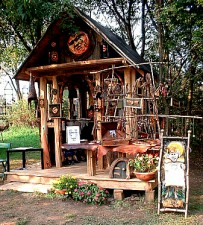
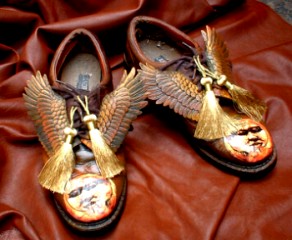
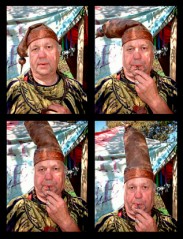
Steve Korpa made this incredible wizard's hat and other items. His display shack, some shoes, and his "Full-Blown Wizard's Hat" are shown here. E-mail Steve
Angie Allen made these excellent units for a pal in New Zealand. Brettuns Village Leather spans the globe to make feet comfortable.
Behold the amazing artwork of Rodolfo Morales-Miranda, who used our thick veg-tan sides as the canvas for his work. Rudy is stationed overseas as part of the military presence in Iraq, and he's a great customer of ours.
We ship to him through his APO address using priority mail. It works out well - seems to reach him fairly quickly. Can you imagine the amount of hours that go into making something like this?
Well, it's not like he can run out to the movie theater or the grocery store.
E-mail Rudy for more information.

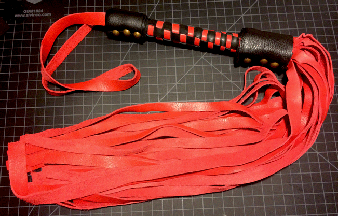
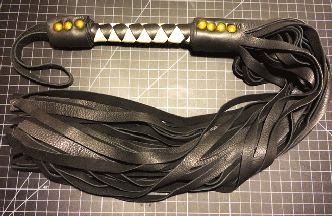
The black whip in the picture was made from your Black Boot military sides in 2.5oz and has 2 plaited underbellys and a 8 plait overlay.
This whip is 6 feet long. I am currently making two 8 foot "indiana jones" style bullwhips out of your dark brown chamois sides. If you are intrested in buying a whip, visit my website http://www.wolfpitwhips.com.
I cater to all age groups, and Sell whips for the sport of whipcracking only.
Thanks - Adam Ouellette e-mail
Thanks to Brettuns Village Leather's very affordable leather prices, I'm knocking out tons of projects. We sell at shows and request.
All of the items are one-of-a-kind. Journal covers; belt bags; wood and leather boxes; key fobs; even a cat-o'-nine-tails (us flatlanders have weird ways of entertaining !).
Thanks again and I look forward to ordering more of everything! - Vern Ray
www.talonhandcraftedcurios.com
www.vernrayleather.com

A great looking headboard made by Andrew Stairs - a fellow Mainer!
I thought you might appreciate these ring-armored, leather bracers I made using your 5 oz. Hickory leather. This is part of an entire armor suite I'm in the process of completing.
The leather corset on my daughter was made using the Olive and Sand nubuck I purchased from you and the corset on her best friend used the Mocha and Cabernet nubuck.
While most of my stuff is for our shooting gear or reenactment activities, this was a fun little project for my granddaughter, who loves three things in life: candy, purses, and her binky. So, she got this kid-sized purse with a "Binky Pouch" attached.
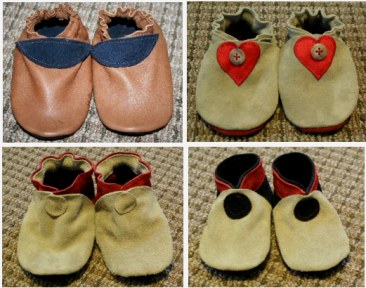
Baby Shoes by Bridget!
Fellow Mainer Bridget uses our suedes to make shoes for her children. Great work!
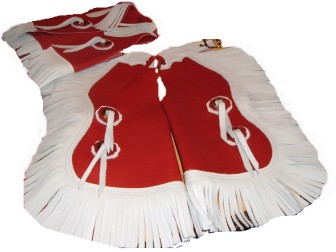
Great Wyoming Chaps!
This is a photo of one pair of kids chaps I made from your Lipstick Red & Snow White leather. Nice leather to work with.
Thanks, Davene Lau
Baggs, Wyoming
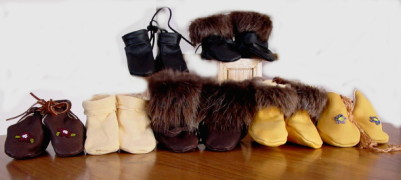
Put Your Cutie In Booties
ALASKAN BABY BOOTIES AND BUTTERFLIES
Theresa Szafran lives in Anchorage, Alaska and runs her own business up there making these wonderful booties.
Her website is great - take a look!
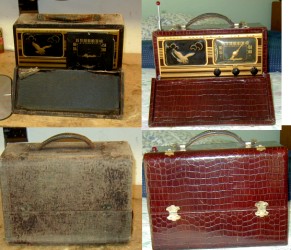
Tom & Pat Gaber Worked a Minor Miracle
Hi: We ordered a hide from you in November 2004.
We covered an old Majestic Mighty Monarch radio with the hide.
You mentioned that you would be interested in seeing the finished product. Here are some pictures of what your hides covered up. It was a lot of work, but the finished radio is beautiful.
But here are the pictures - hope you enjoy them.
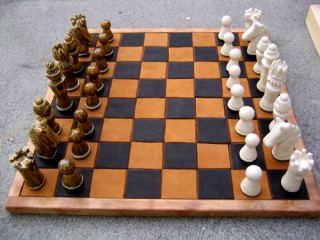
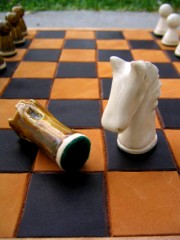
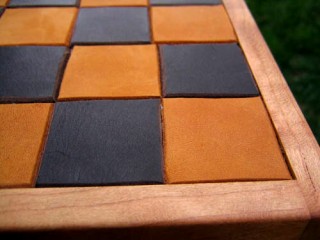
A Leather Chess Board from Lauren T
Wow! What a great idea - a leather chess board! Lauren Tenney made this work of art.
Churchill,as promised, here are the photos of the completed chess set. Thank-you for your incredible help in making this project possible. I made the playing pieces from ceramic clay - the kind you would use to make bowls and such, and sculpted each of them by hand, using my best of each type as the model. I then sanded them, fired them in a kiln, then glazed them (the white pieces are only glazed with clear as the clay is so white) and then fired them again. then I put the little sticky felt bottoms on using self-adhesive felt. The board is cherry and I had the pieces cut for me by a woodworker I know, and then I built and finished it.
I figured out that the total time spent on all aspects of the project - especially the pieces - was around 50 hours!! very worth it. I will be telling everyone crafty that I know about your site. thanks again, Lauren


Bighousedaddy is a resource website for the leather craftsman providing quality instructional Cdroms, Instructional books, as well as providing leather patterns to make Custom Leather Boots.
Making Western Wear? So is Kathy Younger, only she makes it in sizes to fit small dolls!
This gun belt would fit around a GI Joe or Ken doll, believe it or not.
Don't pick a fight with these guys - they'll shoot you in the ankle.

Then they'll ride away on these hosses and hide under your couch.
Thanks, Kathy, for sending in these great photos.
===
From Kathy: Just wanted you to see the world of leather you opened up for me. These two fellas are my favorite figures. I made these chaps today. (I also made the hats - flexible clay and the darker gun belt that you can't really see here). Hmm, this is getting to be pretty fun. I just may be buying more from you in the not too distant future.I LOVE that rich pull-up leather, as you know. I managed to use every inch of it (I mean EVERY inch of it!) in order to make a miniature gun belt. The Colt was made by a blacksmith friend of mine. Two artist friends made the horses and saddles for me. My cowboys fit on them perfectly. I know I'm sounding a bit insane now, but...oh well...
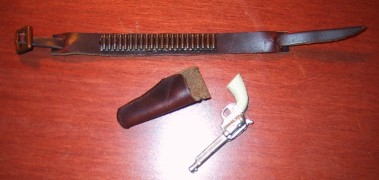
Hello- I've ordered several boxes of your "scrap veg.-tanned leather" to make sheathes for my custom knives. I can honestly say that I've been more than pleased with the quality of the leather AND the quality of your service. I've attached a photo of one of my knife/sheath combo's for you to see... and, if you know anyone who wants a great knife, send 'em my way...!
Thanks! Ike Powell Wake Forest, NC
"Raid Ye Not A Dragon's Lair... For Ye'd Be Tasty Medium Rare..."
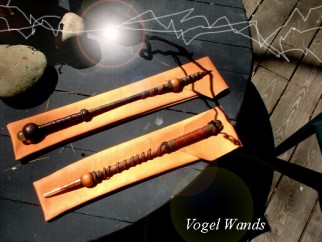
Jim Markell's Whips
Hi, I wanted to tell you how great your Spur Fire cowhide was. I'm enclosing a picture of a bullwhip I made from it, and I intend to pick up a couple of more of these hides to make some more whips with.
Regards, Jim Markell
e-mail Jim here: jim@whipworks.net or visit his website: www.whipworks.net

Stormy Schwindt's New Leather Gear
A nice leather vest and coat with antler buttons, made with leather from you-know-where. Stormy is a teacher out in Montana.
This guy is covered in leather from head to toe, which we think is an idea more people should subscribe to. Stormy's artwork is incredible. Take a look.
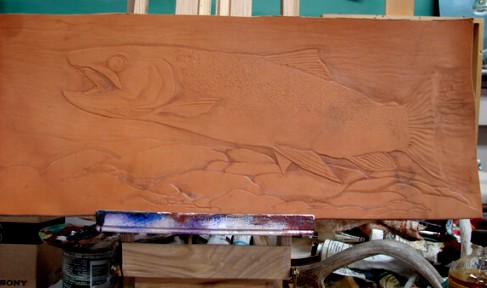
Awesome brook trout carved in leather

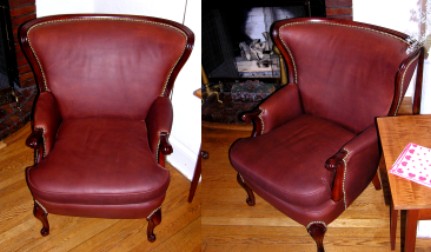
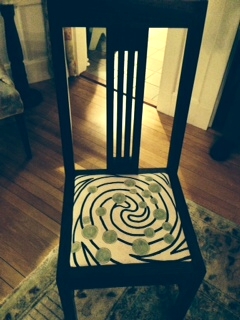
Take a Seat
Garth Thompson did one heck of a job with this great old chair.

Fan your Smudge!
The Spirit Bear is a website that features the work of Linda Pettersen.
Linda knows how to make some incredible smudge fans, and she also knows where to buy her leather!
Visit her website here - The Spirit Bear
From John Purdy over in Vermont
(a suburb of New York City according to most Mainers)
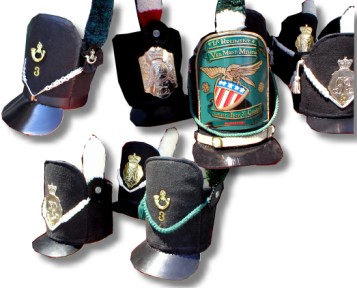
Officer's hats and Shakos made with leather brims!
Contact John here
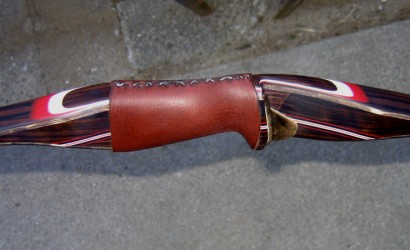
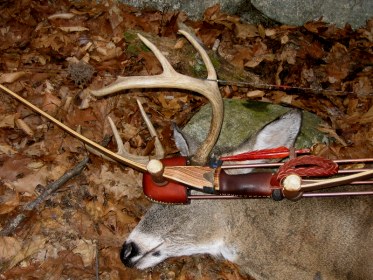
Amazing Traditional Archery
Nothing gives you a firmer grip on your bow when you are trying run an arrow through the boiler of a delicious animal than Brettuns Village Leather!
(ed note: Nice shot, Bud!)

Green Man Leather
Bags, pouches, journals, belts, and more

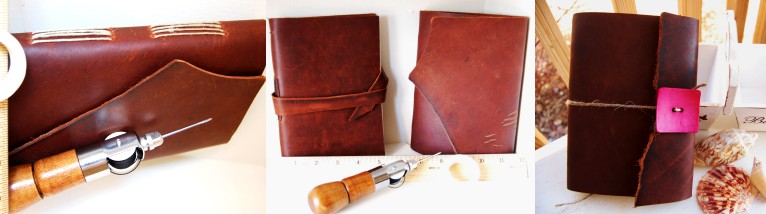
Beautiful leather journals - perfect for doodling!
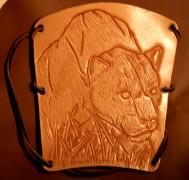
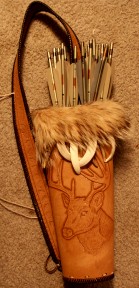
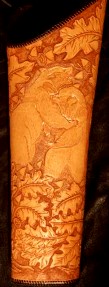
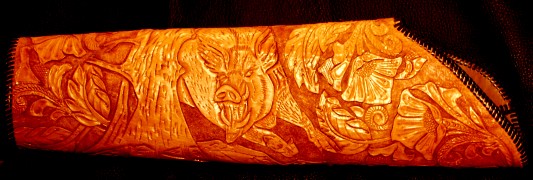
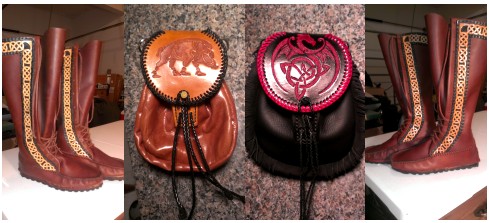
The Mountain Man From Pennsylvania
Hand-Tooled Custom Quivers and Other Items
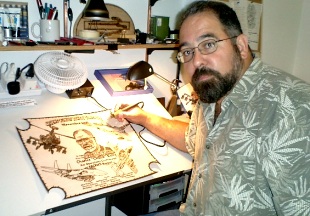
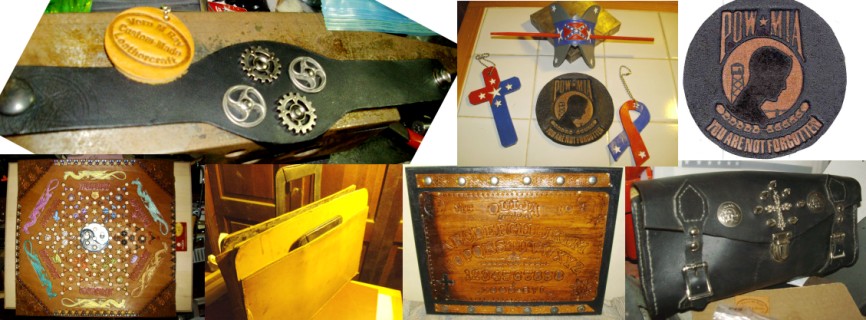
Fred lived in Pennsylvania and was known for his archery shooting skills, as well as his fine custom leather work.
He did every bit of work on these side quivers by hand, just like he did with his wallets, handbags, and other leather items. Here's some more of his work:
The one on the upper right has real boar tusks and badger fur and a fully tooled strap that's been stitched along both edges with our leather cord.
Tooling work like this takes literally hundreds of hours. All of these items were made with leather from Brettuns Village. We still get a real kick out of that.
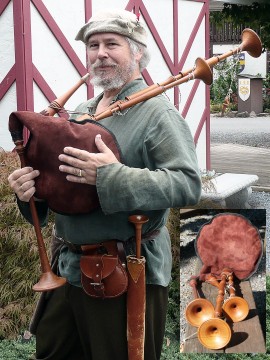
We play historical bagpipes and music from all over Europe generally nothing later than 1650 - nothing Celtic as such. But then the Celts did come from Bavaria...
The leather arrived last week and I worked intensely to make another bag, so fast, that I even had a day to remove the first attempt and tie in all the wooden parts to the bag. It's nice to know Calf hide works. I used some of the black leather as a welt for the edge seam. That looks nice with the oxblood.
Once that was done I played it on & off all day Sat & Sun at our Renaissance Faire. We had either light or heavy rain both days. I got some rain spotting on the outside of the bag, which might dry out over the next days. It doesn't look like it was seeping moisture & gunk through the leather from within.
The best is that the new bag really holds air well and makes playing as easy as it could be, and I didn't have to wait another week to put in into service.
It's an English Great Medieval bagpipe made many years ago by Julian Goodacre in Scotland.
My journey with leather began 40 years ago and has evolved to incorporate rare stones and beautiful hardwoods.
The viewer of this site can see another dimension of how this ancient medium can be used.
Thanks to Brettuns Village for being a reliable supplier of quality leathers and tools
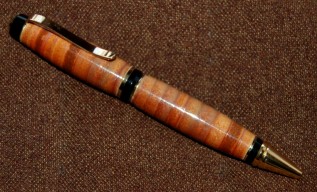
A pen made from leather. Now we've seen everything.
Nice work by Paul Doxsss in Wisconsin.
Thanks again for all of your help with providing some awesome leather! Of the 40lbs of oxblood I ordered, we made 2 full sets of armor (torso, leg grieves, 2 full-arms, and a war skirt) as well as an additional torso piece....and I still have some left!
We made great use of the scraps and I have included several photos below.
In the group shot, I believe all of the helmets and any oxblood you see came from you.
Our friends in Northern Michigan also ordered some oxblood from you.
The helmets are from your thicker leather from a previous order.
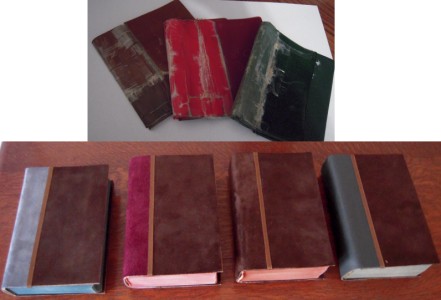
My project: creating leather case bindings for prayer books whose plastic covers have been destroyed over time, but whose pages are still in good condition. Without new bindings, the books will have to be discarded. Here are two photos: one of the old, worn out covers, and one of the books with their new, Brettuns Village leather case bindings.
Amateur, yes, but also quite beautiful!
Thank you for your great leathers and affordable pricing. -Theresa Thomas
M CASTANO ART LLC
2841 Watch Point Road
Shoreham, VT 05770
Tel/Fax: 802-897-2811
www.mcastano.com
From Michael Snow - Mr. Baseball!
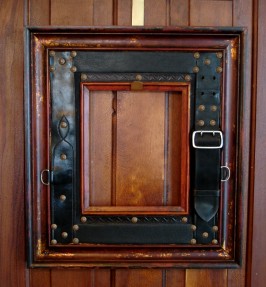
Hello Churchill! I'm sending an image showing a picture frame I've made using the antique upholstery tacks I bought from you.
Amazing Piece I feel like I gave birth upon completion! I'm going to order 200 more of those tacks. Will look through the site and see what else I need.
Hope your well, I hear spring is on the way....no more -24 degrees here in Canada!
Stephen O'Ceallaigh
www.greenmanleather.ca

A while back I ordered some of that yellow lizard leatha.
I then realized I need a small patch of white deer skin and you so honorable sent me a chunk in the mail.
You made a project possible for me and I wanted to send you a few pics of the piece I made.
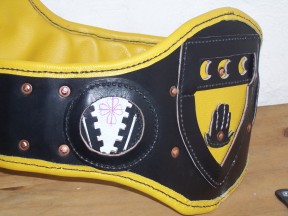
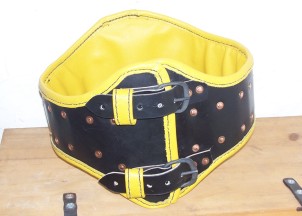
It is a fighting belt for a local sword fighter.
It is lined with steel plates to protect his kidneys and lower back.
Thank you so very much! - Dan
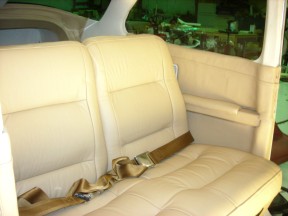
I just wanted to share what we did with the 5 hides I purchased from you several months ago. These are some of the pictures from the interior of my Cessna 172.
The plane will probably be featured in several articles in Cessna Owner Magazine at the beginning of 2010.
The upholsterer I hired to do the work said this was even better than the leather that hehas used on the country music stars coaches in the past 20 years.

Hi Churchill: I just wanted to send you the pictures of the stuff I've made from that North of Cordovan strip I ordered.
They're not the greatest, and I'm certainly new to leathercraft, but I'm pretty proud of them anyway.
I made a single layer belt for my best friend, a double layer belt hand-stitched with hemp for my farmer cousin, and a key keeper to go with it.
Thanks for all your help! ~Noah
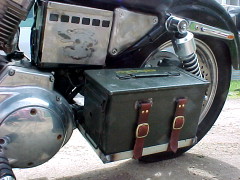
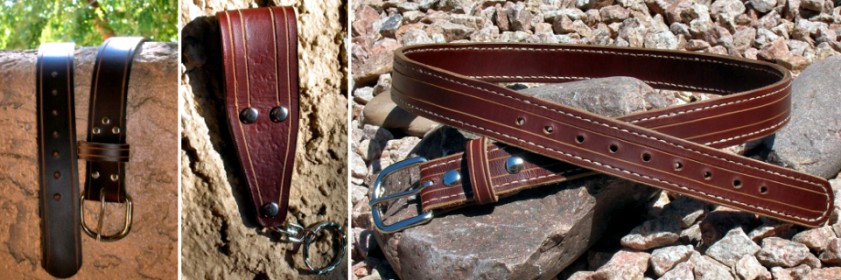
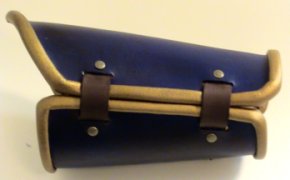
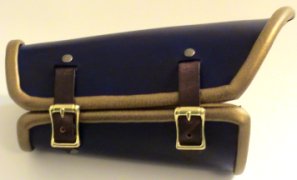
Good old Brettuns Village Trunk Shop makes leather trunk straps that look pretty nice, and they're good for more than just holding a trunk shut.
Here's a set being used to hold a storage box on a sweet ride.

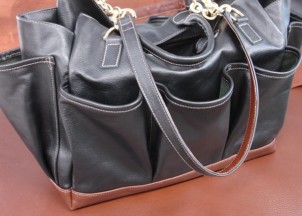
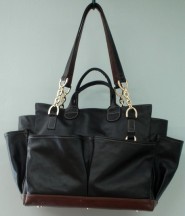
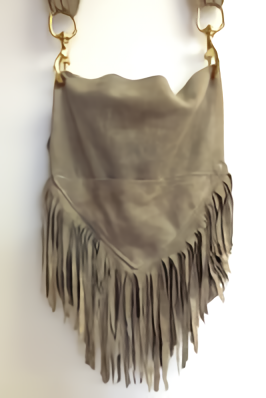
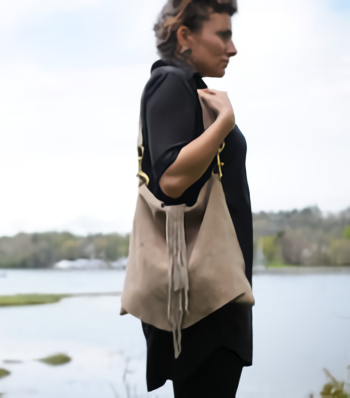
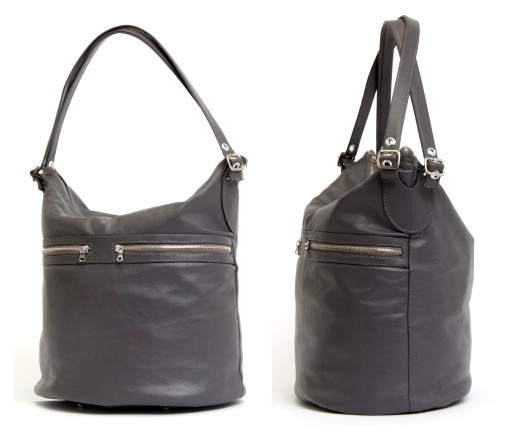
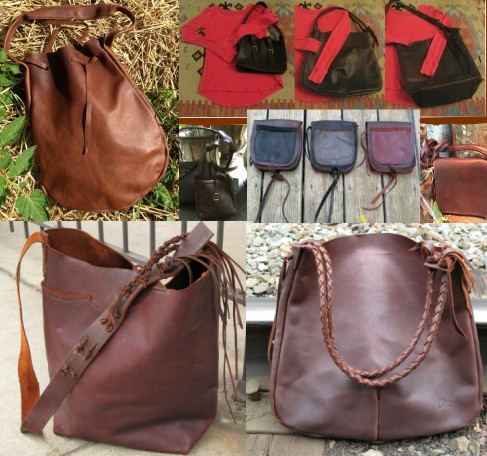
Eco-friendly handbags made from reclaimed materials. There are several handbag styles to choose from.
Each bag is slightly different from the next as the materials are rarely exactly the same. Handbags are designed to have a clean modern style.
The minimalist designs are born out of my desire to show that recycled can look fresh and refined.
Express your individual personality and go green with a handbag from City Kitty.


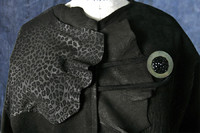
Annemarie Feld creates amazing works of wearable art, and there's some Brettuns Village Leather in there!


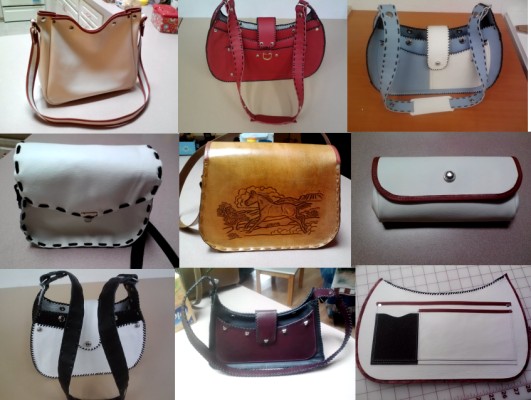
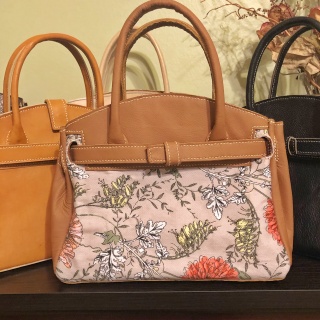
Posh Pockets are uniquely designed and individually crafted by artist Mary North Phillips. Fabricated in her studio, these beautiful and stylish bags are exceptionally well made of high quality fabrics which are personally selected by the designer. All of the bags are fully lined, many with interior leather pockets and some with detailed, hand-stitched accents of imported glass or pearl beads.

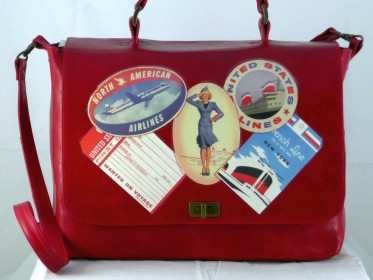
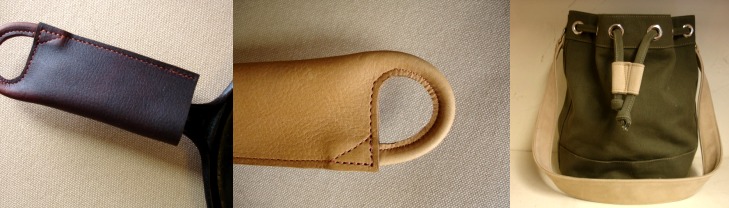
K. Hesketh (UK) found innovative uses for our trunk handle brackets and reproduction travel labels.
You can find these and many more trunk and case parts right here.
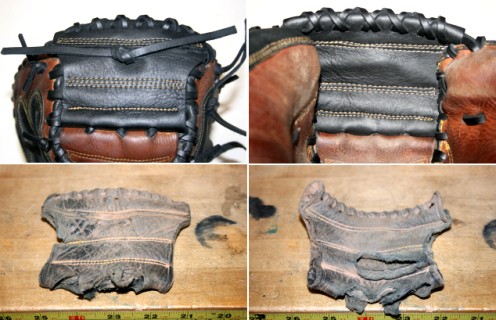
Hey! I just finished the first piece of my armor thanks to the uber fast shipping of the spiffy "Midas" side.
Just a simple clamshell bracer to see how it came together. The leather is perfect and I can't wait to make more with it!
Thanks!
Made from our Black Oil Shale leather by Juan Martinez Navedo.
Great leather, Dyna Solo Bags. If someone has an inquiry they can e-mail me.
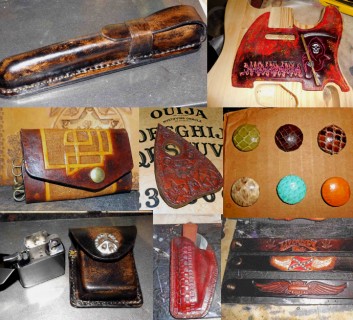
Hey, I noticed you all had a spot on your website showcasing some of your customers' finished projects. Maybe you'd like to put some of these up? I'll admit the mask is a bit much, haha.
Most of this stuff is made from your 3.5 Oz Veg Tan Tooling Sides. The last hide I got from ya'll was a great weight for what I needed and finishes out beautifully. As soon as I sell some more stuff I'll be ordering some more :)
I started working with leather a couple years ago and you guys make getting a hold of what I need easy. I sew everything by hand right now, but maybe sometime I can justify getting a machine to do certain things with.
Just in case you want to put it up, this is where I sell some of my stuff
That yellow lizard print leather didn't look all that promising when it left here. Patricia McDonald, a Mainer, had the vision that we didn't.
Fabulous! Below are more items made by Pat - some great skillet handle covers and a backpack!

This box is made from quarter sawed Red Oak. The outside panels are covered with 100% 18oz Hemp.
The lining is 100% wool felt over a Spanish Cedar frame. The handle is 100% Brettuns Village.
We had to look at this one for a minute or so before it sunk in. This is one of our 4 oz veg tan tooling sides that Jamie Maldonado decided to wet form around a torso that belonged to some guy with no body fat. Incredible. Jamie says he can make you one of these if you want to drop him a line.

That box I got from you has lots of good leather and I plan to use it well.

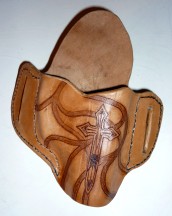
This holster is made from the North of Cordovan strips I received last week.
I haven't tried dying it yet, but so far it's been superb leather for holster-making.
Thanks, Morgan
Thought it would be fun to show you what I make with your wonderful leather.
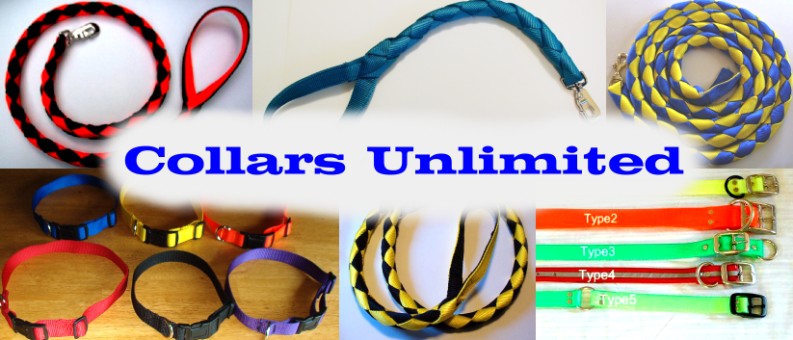
A Great Source for Collars and Leashes - and they're in Maine!
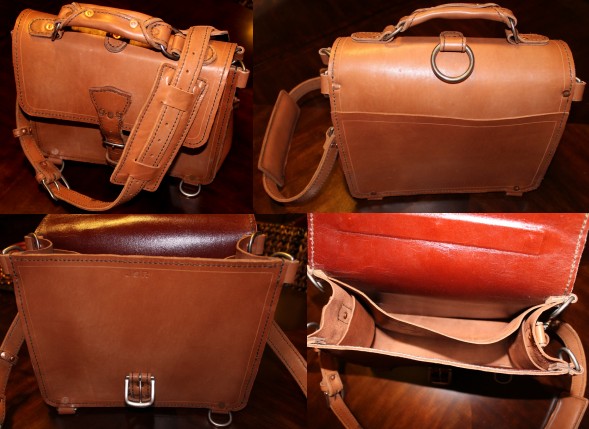
I ordered a side of the Wichita Falls and a couple pieces of the chestnut colored book binders pigskin that you had. With that I decided to make myself a satchel. Other than making a handful of knife sheaths, this was my first real leather project. I cannot take credit for the design, I based it off of Saddleback Leather's satchel design. But I drew the patterns, cut it all out, and hand stitched it all together over the last few weeks. I just wanted to say thanks for the leather, I really like the Wichita Falls sides!
Justin Reeder, Summerville, SC
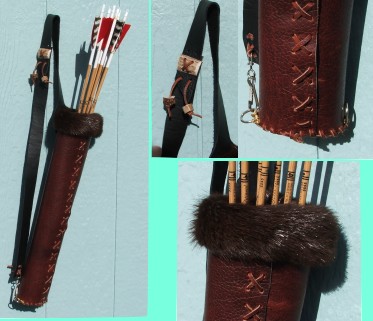
Mike Cox runs Early Archery out in Friday Harbor, Washington (state):
I thought you might enjoy these pix of a quiver project I just finished with material I bought from your store.
The fur is from the Nutria furs you sold some months back, the body leather and lace is from your Bourbon sides.
The hardware, D Rings and spring clasp were also from your stock.
Thanks for supplying great materials. Mike Cox Early Archery Friday Harbor , WA
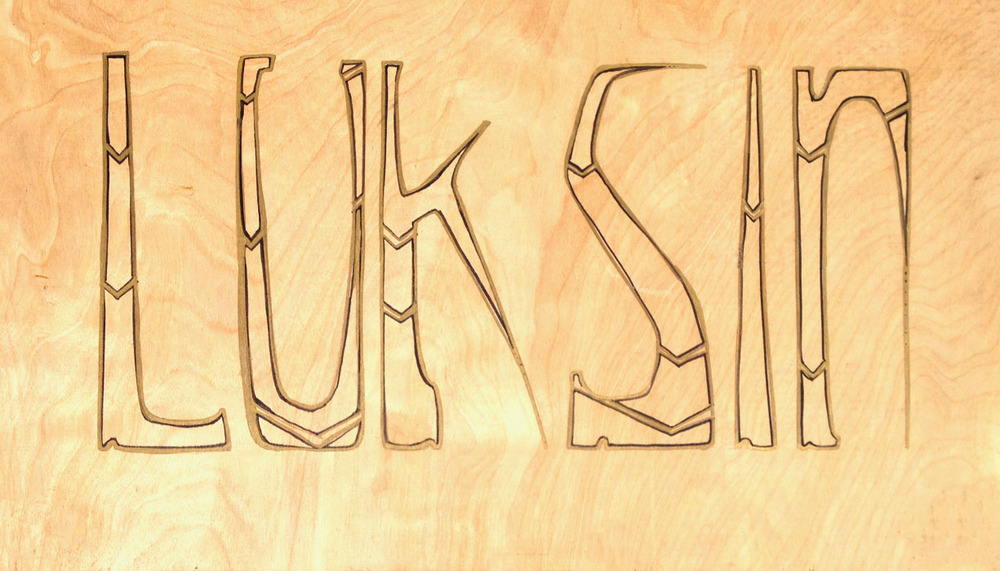
Luksin is a design co. that holds earth and ethics close to it's heart, right next to passion for design.
Luksin leather bags and women's clothing are artisan made. Everything is sewn and printed on the coast of Maine, and garment dyed in small batches in Maine or New Hampshire.
Click here to visit Luksin, one of our leather customers. Click here to visit Luksin's Etsy store.
Contact Amma here
Ron LaMonica is waaaay down in Florida -
Just look at what he does with our leather!

From Clementine:
Proof Positive that all You Need to Get By is a Sword and an Attitude
Hi Churchill & Co, thought I'd show you what I ended up doing with the coal and denim garment sides and the "heap of sheep" black skins that I got from you earlier in the year.
I do costuming and leatherworking on the side (I'm a journalist by trade) and I'd like it to eventually be my main gig, so I turned myself into a walking billboard for my "business" at Comic-Con!
The Jon Snow costume jacket/jerkin/thing was made from the coal side, while the boot-wraps are the heap o' sheep. The Ranger coat is two whole denim garment sides,
hand baseball-stitched at all the seams - and yes, it's functional lacing, if I ever go insane and decide I feel like removing the sleeves for an afternoon in the sun.
(I also used the sunrise wigwam leather to make some bracers for a Highlander costume that of course I didn't get any decent photos of.)
Couldn't have done it without you! :)-
Clementine

I used the piece of leather you sent me to fancy up my bookcase. I had my doubts as to whether this would work or if I'd be ruining a perfectly good piece of furniture.
My wife said, "Yeah, I thought you were pretty much going to wreck it." But, to everyone's astonishment, it looks great. Thank you. I've attached a couple of photos so you can see for yourself.
All best - Jesse
Hi Brettuns Village: Thank you for your product and for your kindness for a student in need. I just wanted to let you know (if it is of any interest) that my piece of furniture was very appreciated and that I got an A+ in that course. I attached some pictures for you. Again, thank you very very much!
Regards; Marcus, Drexel U. Student
Hi Brettuns Village: Thank you for your product and for your kindness for a student in need. I just wanted to let you know (if it is of any interest)
that my piece of furniture was very appreciated and that I got an A+ in that course. I attached some pictures for you. Again, thank you very very much!
Regards; Marcus, Drexel U. Student
From Meg Farrell - click here to visit the website of Farrell & Company
Fine leather goods, hand crafted in Maine!
My name is Ken and I own a small leather business called Tir Noc leathers; this is a just a couple of things that I have made with some of the leather that I have purchased from you. The first sporran was made using your brown or tan rain coat side and features a Celtic boar (the Celtic symbol for strength. The second Sporran was made with one of your black softy sides, and features a Celtic dragon. All are hand carved of course. Both are made in Rob Roy style. The boots were made with a 5 to 6 ounce oil tanned double shoulder, that matched the brown in the customers Kilt perfectly, they have a hand stitched deer insole and a full rubber sole for traction and longer wear. The trim was made out of 2 to 3 oz. veg tan. The boots were all hand stitched and the trim was hand tooled and dyed.
These are a few things I've made with materials acquired from you fine folks!
Thank you for providing such nice materials and tools at the amazing prices you offer!
I wouldn't be able to pursue my craft so freely without you guys :)
From Naoki Tanaka
Customized, hand made, ornate and beautiful floggers to suit any customer - and their made with good leather!
So....seen any good movies lately? Check out Sassmon Leather
Peter R. Says "This is what I make with your leather:"
Hey there: Just wanted to thank you all for the great leather I recently purchased from you, the Crazy Horse Dark Tan.
I'm completely new to leather working, but learning a lot, and really enjoying it. I finished my first project (dresser valet) last night and I love it! 100% hand stitched. I wish I would've started playing with leather years ago!
Thanks again for a great product and prompt shipping. I will be doing more business with you all soon!
Best regards from TX, Robert B

Dear Brettuns Village People: I just received the hides that I ordered and wanted to thank you for throwing in the half hide and the one with the hole in the middle.
I thought I would send you a picture of what I am using these for. We had some custom black walnut chairs made in a Vienna Secession style and I am hand painting the
hides with a design from that period and using them as upholstery for the seats. I did a sample one which is in the picture and now that I have the rest of the hides I will finish the rest.
I think it looks great. I needed 7 more that matched in color and out of the ones I got that will be possible with no trouble. I appreciate who ever did the picking out.
Margaret P.
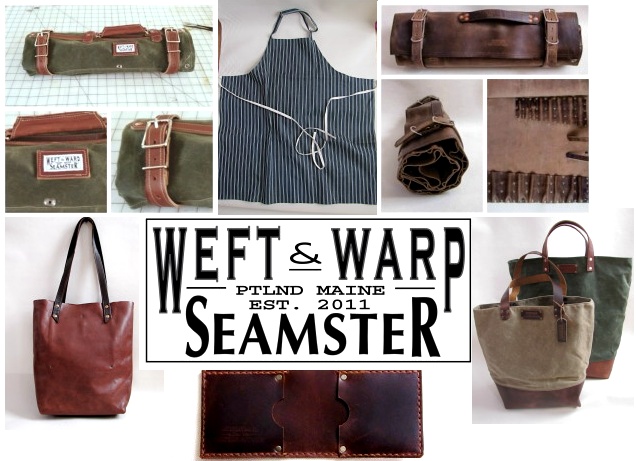
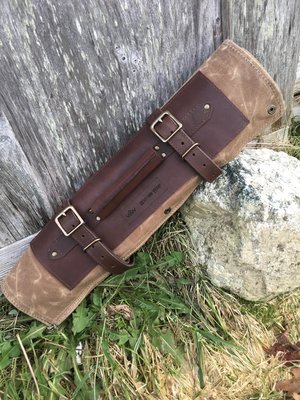
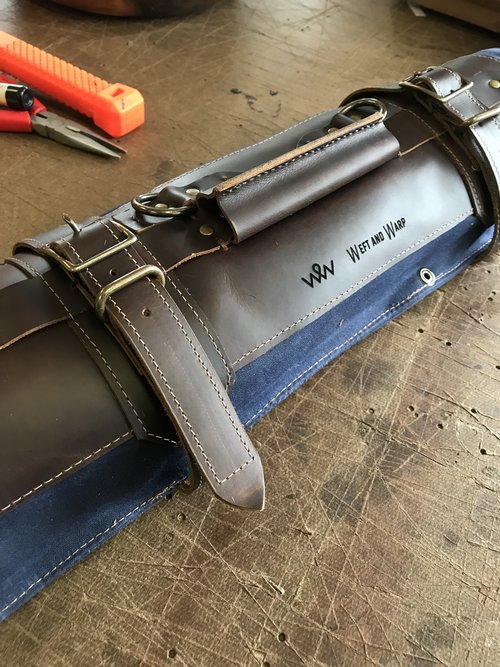
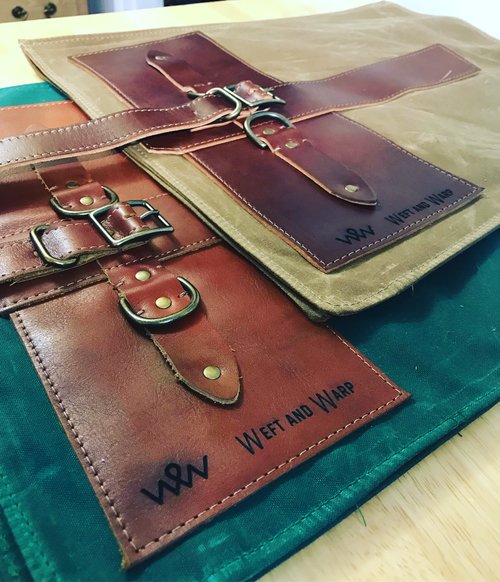
Rachel Legloahec (appeared on 'Iron Chef') is a chef, and skilled leather crafter making custom knife rolls and bags for chefs.
If you're in the biz, get outfitted the way you should be outfitted - with stuff from Weft & Warp!
C. Cantrell picked up one of our panels of Wichita Falls cowhide, from our Scrap Leathers page. Doesn't look like scrap anymore!
Products used: Seiwa Tokonole to smooth the edges and the rough side of the leather.
Fiebing's leather dye Canyon Tan, Fiebing's Tan Kote

TGreen made these carry all bags!
"I buy from you often. I love the leather you have so much and its affordable for a small business like ours.
On our site we have a lot of bags and wallets, even a tiny cement planter that I wrapped with scrap."
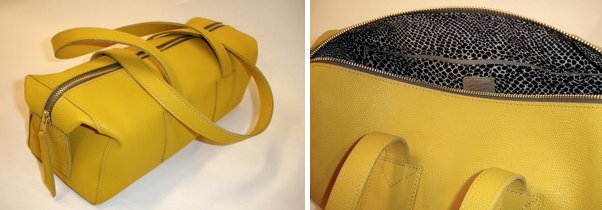
Just wanted to share my appreciation along with a photo of a recently completed project. This handbag is made from a combination of clearance items #33 and #35. I used the calfskin on the inside lining/pockets. I'm very happy with the leathers I've received and am always keeping an eye on the site for bag leather in that beautiful warm yellow color. Take care and thanks again to your team for the quality products and service!
Thank you,
Ted Veatch
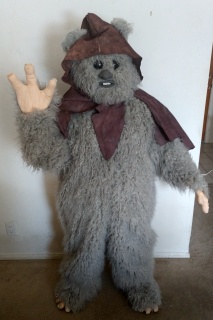
Hi! Just wanted to show you what two suede bends went to making. This Ewok hood! Yub Yub! -Amanda
Vincent made this excellent bag! He says: "I love your products and watch for updates on new leathers coming in.
I ordered a few times but also I pass along links for new stock items to my friends.
I even ordered a nice 12 mm arch punch to punch out .472" wool felt wads for cap 'n ball revolvers.
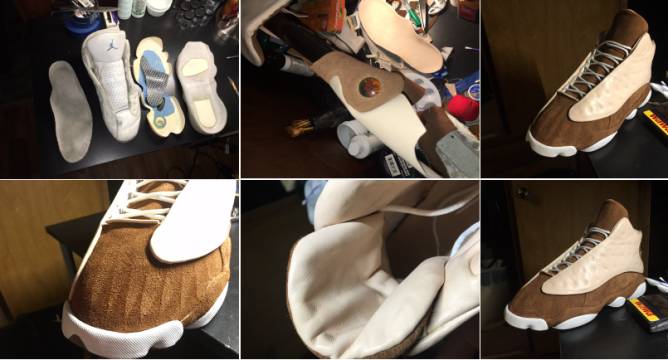
Andrew set his mind to customizing his sneakers - how cool is that? He writes:
"I purchased some suede hides and veg tanned sheep leather from you guys and I wanted to thank you for all the help ! My project was to
deconstruct and rebuild a Jordan sneaker with super high quality materials. Here are some pictures. Thought you might like to see!"
A while back I ordered some of that yellow lizard leatha.
I then realized I need a small patch of white deer skin and you so honorable sent me a chunk in the mail.
You made a project possible for me and I wanted to send you a few pics of the piece I made.
It is a fighting belt for a local sword fighter.
It is lined with steel plates to protect his kidneys and lower back.
Thank you so very much; Dan


Sandra Terry has been a customer of ours for many, many years. She makes a variety of excellent leather goods; you can check out her stuff in her Etsy store
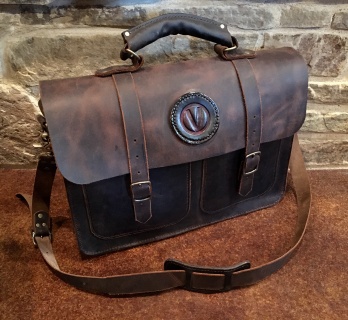
"Thought I'd send you a few pics of the briefcase I finished just in the St. Nick of time for a holster client of mine.
He ordered this for his wife and wanted it personalized with their ranch brand on it. The Black Oak Crazy Horse was a perfect
leather for this bag and he was absolutely stunned at the rustic beauty of the leather and bag. So much that he wants a set of saddle bags to match it.
Thanks!
TIN BADGE LEATHER
DALE DOWDY-MAKER
FARMERSVILLE, TEXAS
469-525-5805
TinBadgeLeather.com